Showing posts with label Paper Doll Dress Up. Show all posts

Thursday, November 7, 2013

Exploring Cricut-Monster Jam

Hello! It's my turn to share at Exploring Cricut and I created with quite a few Cricut cartridges this time. We went to the Monster Jam Truck show and took quite a few pics. I narrowed it down to these and the rest will go in a clear sleeve fitting 12 pics.


I really struggled with creating this layout because I don't have any boy cartridges. However, in trying to think outside of the box I think this layout came through without them. I improvised on the images and hope you like what you see. The journaling spot on the second page was actually going to be for tickets, which I can't find. I'm hoping they turn up, but if not I will continue the rest of the journaling on what is already attached.


The dots were created by using Liquid Pearls to add a "rivet" look. I just realized that Ribbons and Rosettes would have been good to use too because the font on there already has the holes if you don't want to use the Liquid Pearls.

Recipe:
12 x 12 2 page layout
Papers - DCWV  and scraps
Title - Birthday Bash 1.23, shadow 1.31"
Green, Purple Grave Digger Car - Paper Dolls for Everyday 3.25"
Skeleton Face - Indie Art 1"
Superman Truck - Paper Dolls for Everyday 3.45"
Red Cape on Truck - Paper Doll Dress Up 5.15"
Shield - Create A Critter 1.46"
"S" - Birthday Bash 1"
Wheels on Truck - From My Kitchen 8.69", 12.07"
Flag - Paper Dolls for Everyday 7.62"
Sand - Paper Dolls for Everyday 7"
Film Strip - Disney-Mickey and Friends 4.65"
Liquid Pearls Platinum, Yellow, Cinnamon, Firefly, Purple  and Silver Stickles, black ink

Thanks for stopping by and remember there is still time to enter our challenge!

Annette


Monday, March 11, 2013

Exploring Cricut-Luck O' The Irish

It's challenge time at Exploring Cricut. The challenge is to create any card, layout or project using a shamrock and your Cricut, of course! 


I created this card using a couple cartridges and really love this color green because it looks so springy. Our mountains of snow have finally melted after some rain this weekend and it smells like spring. I hope we don't get anymore snow; but never say never in the midwest!


After running the medallion through the Cuttlebug I used Diamond Stickles on the Swiss Dots to give a little shimmer. 

Recipe:
A2 cardbase
Shamrock - Paper Doll Dress Up 1.67"
Medallion - Elegant Edges 2.06"
Sentiment - My Creative Time
Diamond Stickles, ribbon, corner rounder

Enjoy your Monday and hope you decide to play along with us. Check out my DT sisters and brother for some more fun ideas!

Thanks for stopping by!

Annette


Thursday, February 28, 2013

Exploring Cricut Project - Stars in the City

Hello! Today is my turn at Exploring Cricut and I have a project that really easy and fun to work on. My daughter's school has a fashion show that the kids can choose to participate in called "Mad For Plaid." They are to take an old uniform and use it on a new creation. The girls decided to get clothing inspiration from the show "Sex In the City" character Carrie Bradshaw.

They changed the name to  "Stars in the City" because they are known as the Stars (St. Teresa's Academy). They also created a really pretty blue top with plaid on the cuffs and a Peter Pan plaid collar.


The Cricut was perfect for their project. I got out the heavy (the red packaging) Heat N' Bond and ironed the plaid to it. The settings for my material were Blade Depth 4, Speed 3, Pressure 4. I did use multi cut 2 x's.


For the stars I found a really pretty yellow ribbon and adhered the Heat N' Bond to that and ran it through the machine at the same settings. I had never used a ribbon to cut out images. We couldn't find the right shade of yellow in fabric and this was awesome. To get the yellow behind the windows I just cut little pieces of the ribbon and slid them under the plaid; ironing them down as I went.

The girls came in 3rd for the popular vote for their outfit and had a great time! 

Recipe:
Cityscape - Paper Doll Dress Up 12"
Stars - George and Basic Shapes 1"
Fabric, ribbon

Don't forget that you still have time to enter our challenge this week. Even if you don't have a pet there are so many cute animals to choose from using the Cricut. We'd love to see your work:)

Thanks for stopping by!

Annette

Thursday, January 31, 2013

Exploring Cricut - Shamrock Wreath

I have a fun project to share with you today for Exploring Cricut. I have been wanting to make a burlap wreath for quite some time and hope that you will be inspired to make one too:) Sorry if the picture looks a little dark. I took this on my garage door and the lighting just wasn't cooperating.


The process is very simple. Any craft store should have the items necessary. You will begin by weaving the burlap through the wire holes. As you can see, there are 3 different rims and I chose to weave the burlap through all three. I started with the bottom and worked my way up and back down leaving a loop through each layer. You will also be pushing the burlap together after each loop to alleviate any gaps (the wire rim showing through).  Make sure to keep the loops the same dimension and then at the end you can fluff the loops up.


This is the back of the wreath when finished. The ends were all just tucked inside the wire.


I started with about 6-8" burlap tail and once finished I just weaved that through the back so that it would not hang down. I have about 5 to 6 yards left over of the burlap when I completed the wreath. It is surprisingly sturdy and the burlap doesn't really have room to move around.

To create the shamrocks, I laid them out on my Gypsy to select the sizes that I wanted. The foam that I used had adhesive on the back, which allowed me to layer the shamrocks together to give them more height on the wreath.

I used the deep cut blade to cut the foam with the speed being 3, pressure 4, multi cut 2 and blade depth 5. I also placed the foam on the mat right side down because the rollers will leave an indention. So, when using the Gypsy you will need to flip your image so that the roller marks will not be there and your cut will come out correctly.


After adhering the shamrocks together I decided that this wreath would be great for lots of different uses and I wanted the embellishments to be able to come off easily. I cut the stems down and then wrapped the heavy twine around the flowers. I hot glued them together to give more stability. The shamrocks were hot glued onto the flowers and each other. I then took the heavy twine and tied the embellishment to the wreath so that when I am ready to change the look I just snip the twine and save the look for the next time. I did tie the twine through the rim of the wreath in 3 different places. This is very sturdy and hopefully will withstand the elements of outside.

I will warn you that I have heard that burlap doesn't smell so good in the heat. I would suggest, if you have a storm door, to not put this in between the storm and your front door. Rather, if you front porch is covered to just put on the outside of your storm door. Now, of course, this can be easily used inside as well. I think over a mantle would be very pretty as well. Oh, there are so many choices. Maybe, I will need to make more than one of these:)

Recipe:
18" wire wreath
Burlap 2 rolls (10 yards each)
Shamrocks - Paper Doll Dress Up 5.71", 4.53", 2.76"
8 1/2 x 11 foam (2 sheets - 1 glitter and 1 regular; both sticker backs)
3 St. Patrick Flowers
Twine, hot glue

Thanks for stopping by and remember our challenge ends this Saturday:)

Annette

Thursday, July 19, 2012

Exploring Cricut Project - Christmas

If you are looking for the Exploring Cricut Christmas in July go here. You have until Saturday, July 21st for blog candy and challenge:)
_______________________________________________________________________________

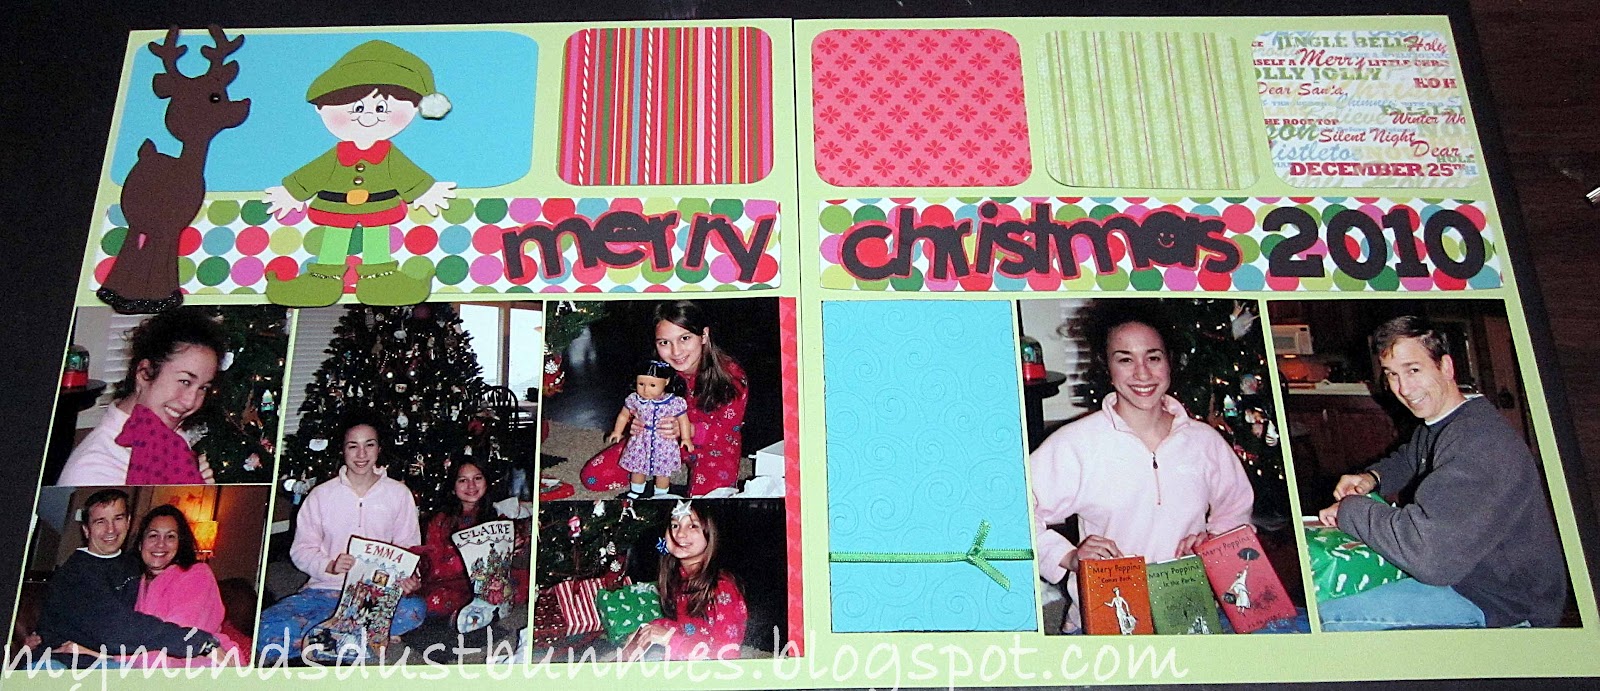
Hello Everyone! It is my turn to share at Exploring Cricut and I decided to keep with the theme of our challenge. I created a 2 page spread for Christmas. I thought I had finished all of 2010 Christmas and found some I had missed. 


I kept it fairly simply and will probably journal on the blue rectangle. I have to admit that my journaling has seen better days, especially on activities that we do yearly. I tend to just put the month and year.


One of the nice things about the Gypsy is being able to lay out the design prior to cutting. This can be done with DS or CCR. I was glad I remembered to cut my geometric shapes with the Gypsy. It was so much faster than me cutting and measuring the squares and rectangles. 


I added a red nose and black hooves with Stickles. 


Recipe:

12x12 2 page layout 
Elf - Paper Doll Dress Up 4.85"
Face - Peachy Keen Stamps
Merry Christmas - Simply Charmed 2.58"
2010 - Birthday Bash 1.31"
Reindeer - Paper Doll Dress Up 5.77"
Squares/Rectangle - George and Basic Shapes 3.25"
Patterned Paper Under Title - George and Basic Shapes 1.76"
Black Stickles, Xmas Red Stickles, Gold Stickles, Gold and black brads, Snow marker, black pen, ribbon, Divine Swirls embossing folder, chalk, Signo white gel pen, Glossy Accents

Thanks for stopping by!  Remember you still have time to enter the challenge and the blog hop for blog candy!

Annette

Thursday, May 17, 2012

Graduation Time!

Good Morning! Almost the weekend!! Anyone have graduations this year? I have nieces and nephews this year and I need to get busy. I have to say that this little guy is so fun. This is a stamp from The Cat's Pajamas and I pieced he and the balloon together. I have said in the past that piecing stamps are not always my friend; but I think this one came out pretty good:)  Hope you get some inspiration for your graduation cards from this.


Recipe:
A2 card base
Papers - Stampin' Up, Bazzill, Scraps
Bunny, balloon, sentiment - The Cat's Pajamas
Clouds - Create A Critter
Grass - Paper Doll Dress Up (I apologize I didn't write down the sizes for grass or clouds.)
Pop dots, black ink

Entering:
ABC DT Challenge Graduation or Wedding Card


Thanks for stopping by!

 Annette

Monday, March 26, 2012

Exploring Cricut Challenge #12 - "It's a Spring Thing"

Good Morning! Time for another challenge at Exploring Cricut. The challenge is to create any card, layout, or papercraft celebrating Spring in the colors pink, green, yellow, purple, blue and white. Doesn't that sound like fun? It was for me. I haven't been able to craft much lately and I really enjoyed making this happy card.  I hope you decide to join in the challenge too:)


I embossed the butterflies before coloring them in and added some touches to the face stamps.

Recipe:
Card base - A Child's Year 9" x 5.75"
Grass Tufts - Create A Critter 1.85"
Grass Strip - Paper Doll Dress Up 1.14"
Tulips - Create A Critter 2.61"
Sun - Doodlecharms 1.74"
Tulip faces - PK Princess Face Asst.
Sun face - PK Everyday Character Faces
Sentiment and butterflies - Hero Art Stamps
Black embossing powder, Versamark, pop dots, white Signo pen, back .005 Zig pen, chalk, Copic markers, Glossy Accents

Thanks for stopping by!

Annette

Wednesday, October 19, 2011

Hello Kitty Halloween

I am still working on Halloween cards and this one today will be for my sweet 11 year old. She loves Hello Kitty and thinks she is super cute. I agree:) Today I am entering this card in Bitten By The Bug 2 and Throwback Thursday. They both required a Halloween theme. BBTB2 asked for something cute and Hello Kitty. Emma asked for the use of the card feature on a cartridge. I came up with this cutie. Hope you like her:)

Her hat is some mulberry paper that has some streaks of gold. I hadn't use mulberry in a really long time. It is a fun paper to play with.

The card feature is from Celebrations and the stars that are on the inside of the card are from the cut out.


Recipe:

Card base - Celebrations 10.69" before folding
Stars - Martha Stewart Fine Glitter Silver
Papers - Stash
Hello Kitty - Hello Kitty Font 3.43"
Witch Hat - Paper Doll Dress Up 3.89
Sentiment - Peachy Keen Stamps
Stickles - Yellow, Black, Orange
Prima Flowers, Pop Dots

Thanks for stopping by:)

Annette

Thursday, October 13, 2011

Halloween Layouts

Well, I am finally get done some layouts from last year. I have been scrapping all my life in one form or another. I really started scrapbooking when my oldest (16) was a baby. I didn't care for the baby books that were out way back when and wanted to do something different and came across Creative Memories. Boy, have things changed since then.

Today, I am entering the challenge at Paper Playtime. The challenge was to use black, orange and purple on a project. I used a few different cartridges to get this layout done. 


This layout was inspired from another blogger, Bling Queen. I really like the background papers. The orange paper with the embossed bats are really fun:)


Recipes:

Ghost Layout:
Papers - DCWV Ghosts and Goblins Stack, Basic Grey Eerie Witches Brew, K& Company, Bazzill
Frame - Storybook 2.86"
Flourish - Cindy Loo 2.10"
Orange Ghost - Paper Doll Dress Up 5.17"
White Ghosts - Mini Monsters 4.40" and 5.17"
Circle - George and Basic Shapes 2.18"
Purple Scallop Circle - Happy Hauntings 3.00"
Spooky - Happy Hauntings 2.13"
Black Ink, Stickles

Halloween Layout:
Papers - Making Memories, Doodlebug, Bazzill
Walkway - Paper Dolls for Everyday Cuttlebug Folder - Tiny Bubbles 1.46"
Title - 2.04"
House - Mini Monsters 5.91"
Light Post - 3.26"
Monster in Hole - 2.00"
Witch - 5.91"
Cauldron - 1.17"
Free Rides - 0.66"
Tombstone - 2.67"
3 Eye Monster - 2.52"
Tentacle Monster - 3.13"
Spiderweb border - sorry don't remember maker of this one
Black Ink, Stickles, Signo Uniball White Pen, Glossy Accents

Thanks for stopping by:)

Annette

Tuesday, September 27, 2011

Eek!

Well, this little cutie is too cute to scare anyone. Doesn't she look surprised! There are so many great creations right now in blog world. It really puts me in the mood for the upcoming season.


Recipe:
A10 card base
Solid Paper - Bazzill
Pattern Paper - Bo Bunny
Face Stamp - PK 490 Everyday Character Face
Twine - Pink Paislee Soiree
Embossing folder - Cuttlebug Skeleton Scroll
Monster - Paperdoll Dress Up 3.08"
Circle - George and Basic Shapes 3.31"
Sentiment - My Pink Stamper Happiest Moments
Popdots, black ink

Entering:
Peachykeen Stamp Challenge Sketch with a Twist (twine or embroidery floss)
Cardz TV - Challenge #91 "Things That Go Bump In the Night"

Thanks for stopping by:)
Annette

Wednesday, September 14, 2011

Musical Cats

Well, I finally did a layout with Fantabulous Cricut as my inspiration! The challenge this week was to do something musical. Boy, do I have a lot of that to do for my older daughter's book. Before I know it, there will be another performance and more to do:) These pictures were taken this summer so I'm not too far behind. We made her cat costume. I have to say the tail, for me, was the most fun. I used 5 different colors of tulle and the base was a nylon hose stuffed with polyester fiberfil.  They were cut in strips, 2 pieces sewn together and when pulled on the ends created a puff ball that was then sewn to the base. Her tail inspired a lot of the other girls too so they also created tails to match their costumes. It was too hot this day, but other peformances she wore one of her legwarmers on one leg. I sewed yarn to just to give some dimension to it.
This particular layout was for the "Cats" Musical song Jellicle Cats

The wheel paper was inspired because the cats live in a junkyard. I drew with the cri-kit pens in
black before cutting out.


This cat is also singing and the black cri-kit glitter pen was used on this one too.

This particular number was the opening act for "Music Man" so the backdrop had some
fun colors that we decided to pull onto the layout.


Thanks for stopping by:)

Recipe:
Cityscape - Plantin SchoolBook 12.70" width on gypsy
Font - Hello Kitty Font 2.38" height on gypsy
Gold Cat - Paper Doll Dress Up 6.56" height on gypsy
Grey Cat - Paper Doll Dress Up 6.69" height on gypsy
Barrell - Paper Doll Dress Up 7.77" height on gypsy
Musical Notes - Gypsy Wandering & Twinkle Toes 2.38" and 1.00" height on gypsy
Cri-Kit Glitter Pen - Black
Copic Markers - musical notes pink and blue RV21 and BG15

Entering:

Fantabulous Cricut Challenge Me Monday #77 - musical notes or instrument

Annette