Tuesday, January 31, 2012

Valentine Topiary

Hi Everyone! Today I wanted to share a quick idea if you are needing some Valentine inspiration. There definitely is a lot to choose from out there. This took about an hour to make and I am thrilled with how it turned out.

I hot glued the cupcake liners to the styrofoam ball. I had my husband drill a small hole in the bottom of the ball to then glue the dowel rod in place. To keep the rod sturdy I glued some styrofoam in the bottom and pushed the rod through that as well.


Recipe:
Bucket - Target
Dowel Rod - changed the color to pink by running it through my pink Staz On
Styrofoam ball - Joann Fabrics
75 Cupcake Liners - Joann Fabrics
Ribbon, filler - stash

I hope I've inspired you to create some heart goodness:)

Thanks for stopping by!
Annette


Monday, January 30, 2012

Exploring Cricut Challenge #9 - Cricut 1, 2, 3

Hi Guys! Did you all have a nice weekend? It sure flew by didn't it. Today is "challenge day" at Exploring Cricut. The challenge is called Cricut 1, 2, 3.  Use at least 1 ribbon, 2 Cricut Cuts, 3 buttons, brads, jewels in any color or theme. I chose one from Cindy Loo and Straight from the Nest. These were taken last spring of these cute little babies. We had at least 3 nests that birds were trying to build in trees or around our home. It was kind of funny. One robin family was trying to be inside our front porch and my husband kept going out and removing it. I can't really blame him as it was quite messy if you know what I mean. This bird was determined to be by our porch and she built her nest right on the outside for the world to see. It really was a great location for us because we were able to watch the birds be fed and learn to fly. I'm hoping we get lucky again this year too:)


Recipe:
12 x 12 layout
Papers - K &Co., Bazzill
Birdhouse - Cindy Loo 3.48"
Title - Straight From the Nest 3.18"
Fiskar punch
Green 1/2 Circle - Heidi Swap Writer's Block
Kraft Journal block
Brads - Bo Bunny Cuckoo 4 U ICandy
Ribbon - Stash
Stickles - Stardust

Thanks for stopping by!
Annette

Thursday, January 26, 2012

Roses Bouquet

Hi Everyone! Today I have a card that I made for a birthday celebration. I am entering this into a couple challenges too. Over at Birthday Sundaes the challenge is a birthday card with sentiment and at Card Makin' Mamas the challenge is something old. Well, I would say the oldest piece of this card is my Stampin' Up paper called Barely Banana. I'm kind of embarassed to say, but I have had this paper for 12 years. Why so long you ask? I used this color when I made my youngest birth announcements and got extra. I really like this shade of yellow and as it started to dwindle I kind of saved it. Silly right. I could have just bought more. Do you ever do that with papers? It is even harder with pattern papers. Such an addiction:) My new year resolution is to use what makes me happy and not worry about saving it for just the right project. If it works it should be used and enjoyed:)

Hope you like it:)


Recipe:
A2 card base 
Papers - Stampin' Up Barely Banana, stash
Bouquet - Sweethearts 4.18"
Sentiment - Stamp set from Recollections
Fiskars punch
Divine Swirls Embossing Folder
Inside of card - computer generated
Stickles, Perfect Pearls, EK Success Colored Pencils
Ribbon - Michael's

Entering:
Card Makin' Mamas - Something Old
Birthday Sundaes - Birthday Card with Sentiment on Front

Thanks for stopping by!
Annette

Wednesday, January 25, 2012

Challenge to Use Blue

Hi Everyone! Today, I have a layout that I am using for some after dance pics of my older daughter's performance last May. I am really trying to balance my cards and scrapbooking. It seems so much easier for me to make a card, but I'm finding that my scrapbooking is getting neglected. So, I thought with a new year I would get back in gear. If you're feeling in the same boat I did want to share a website called scrapbookchallenges.com. There are some great sketches for inspiration.


Recipe:
Papers - DCWV Garden Stack
Diamond Pattern Circle - Printing Press 10.89
Polka Dot Pattern Circle - Sweethearts 14.23
Leaves - Create A Critter 2.27"
Flowers - Prima
Clear Dots - Skittles
Ribbons - Stash
Brown ink

Entering:
Little Scrap Pieces Blue

Thanks for stopping by!
Annette

Tuesday, January 24, 2012

Burst of Color!

I love the color pink! To me it is like black or brown because it can go with so many different colors. I created this card and played around with dimensions for the flower. It was a lot of fun to make because, again, I kept adding things. I don't always do that as I am more of a CAS gal, but I do like the look. Hope you do too:)


Recipe:
A2 card base
Flower - Forever Young base 3.25", 2.65"; flower 3.25", 3.08", 3.00", 2.65" 
Border - Fiskars punch
Papers - Stampin' Up, K & Co.
Stickles Diamond
Hemp, button

Entering:
Bitten By the Bug 2 - Dimensional flower
Die Cuttin Divas - Button, bow and/or bling


Thanks for stopping by!
Annette

Monday, January 23, 2012

Heartfelt Get Well

Hi Guys! Welcome old and new followers. It's nice to have you here. Well, the weekend flew by too fast. It started Thurdsay with my birthday and kid/family activities didn't stop until Sunday evening when my older daughter danced in a performance for the Chinese New Year. Seems the older one gets the faster time goes. I'm not sure that is a good thing, but it was a fun weekend of family togetherness:) Today I am sharing a card that I made using paper piecing. This isn't something I do often. When I have used this stamp in the past, I had colored it in with markers or pencils. This is such a cute stamp and I'm glad that I pieced it this time.


The hearts and cork were pieced onto the stamp. I added white stitching on the black and red with my white Signo pen. I'm not the fastest cutter so the hearts were a little time consuming, but I think it was worth it. What do you guys think? I think this will cheer someone up who is not feeling well:)

Recipe:
A2 card base
Medicine Jar - Stampin' Up
Papers - scraps
black ink, white Signo Pen

Entering:
Paper Sundaes Paper Piecing


Thanks for stopping by!
Annette

Thursday, January 19, 2012

Exploring Cricut Daily Project - Lover's Lane

Good Morning Everyone! I'm so glad you stopped by as it is my turn to share with you a project for Exploring Cricut. I have a Valentine's layout for you and it was so much fun to do. I used quite a few carts to accomplish this one and a lot of stickles:) The name was chosen because my husband's hometown has a street called Lover's Lane and I have always thought it was a very pretty road to travel; perfect for a Valentine page.


Once I have decided on a theme I like to use my gypsy to map out the cuts so I can see how big everything needs to be. From that point, I will either make a tab for each item to cut or group by color. For this particular layout I chose to have a tab for each cut instead of color. I wanted to make sure that the cuts stayed together since there were so many pieces per item.

As you can see, I changed my final layout once I cut them out because I didn't like that the road was hidden. The border was welded together to fit the length of the 12 x 12 pages.


I really like the letters from Storybook. I haven't used this cut very often and it was helpful for me to have the booklet out so that I could make sure and get the right accent frame to go with each letter.


I used the white Signo pen on the wheels and then I added Glossy Accents to it as well as to her shoes, lights and Stickles on basket.


Glossy Accents was added to the cat's heart, the cat and dogs' black eyes and the dog's collar.


Recipe:
12 x 12 2 page layout
Papers - Crate Paper Farmhouse, Bo Bunny Crazy Love, DCWV, stash
Border - Elegant Edges 1.02"
Title - Storybook 1.31"
Apostrophe - Indie Art (actually a rain drop) .79"
Girl w/scooter - Sweethearts 3.45"
House - Everyday Pop Up Cards 3.15"
Heart chimney - Sweethearts 2.85"
Volkswagen car - Sweethearts 1.62"
Road - Paper Dolls for Everyday 2.69", Argyle Cuttlebug folder
Tree- Sweethearts 4.99"
Dog - Sweethearts 2.19"
Grass - Paper Dolls for Everyday 1"
Cat - Sweethearts 1.92"
Peachy Keen Critter faces
Stickles - Fruit Punch, Xmas Red, Stardust, Firefly, Cinnamon, Golden Rod
Liquid Pearls - White Opal and Pewter
Ribbon - Joann Fabric's
Prima flower, brown ink, pop dots, Glossy Accents, white signo pen, black micro pen


Thank you for stopping by! Don't forget to enter the challenge over at Exploring Cricut. We'd love to see what you create:)
Annette


Wednesday, January 18, 2012

Sweetheart!

Hi! I hope your day is going great! I had a chance to make a Valentine card and I have to say I experimented on this one with a couple different things. I wanted the candy to show through instead of rest on top of the image so I used vellum. But, as we all know vellum can be tricky to adhere to; so I used Stickles and then Glossy Accents to attach the candy to the vellum. Well, I couldn't leave well enough alone and I decided to adhere glossy accents to the outside of the vellum. I do like how it curled the vellum around just like a real gumball machine, but I don't like the crinkles I would have preferred a smoother look. If any of you have tried this I would be interested to hear how you kept it smooth. I am glad that I played around with it as I think it is still a fun card.

I also used paper that I received from Diana at D.L.Art (the black with silver). I think the texture is so pretty. The papers are made with silk and cotton and I am excited to play with the rest of the patterns:)


Recipe:
A2 size card base
Papers - Bazzill, American Craft, silk/cotton papers
Gumball - Sweethearts 3.75"
Sentiment - My Creative Time
Stickles - Xmas Red, Turquoise, Firefly, Tangerine, Thistle, Yellow
Liquid Pearls - Pewter
Ribbon - Stash
Glossy Accents

Entering:
Getty Cricky Link Up Love Party - a way to get to know each other and blog inspiration:)
Free Pretty Things for You - Whatever You Want Wednesday 
Whimsical Designs Anything Goes
A Muse Studio Love Is In the Air

Thank you for stopping by!
Annette


Tuesday, January 17, 2012

Snow Fun!

Good Morning! It is a little chilly here again today after being in the 50s yesterday. We can only dream about making snowman or craft about them:) Today, I am sharing a winter scene card. One of the cartridges I used was A Child's Year and I have to say this is one of my favorites. When I first got this I didn't even realize that it had a font too. If you haven't looked at this one you might check it out and be pleasantly surprised.

I chose to add a touch of color on the silhouette, which is something I hadn't done before. I really liked the heart and bird and wanted them to pop a little more. Adding the red gave them a nice touch.


Recipe:
A2 size card
Papers - Stash
Silhouette - A Child's Year 2.50"
Mat - Elegant Edges 5.25"
Embossing - Snowflakes Cuttlebug
Twine - A Muse Studio
Stickles - Stardust

Entering:
Stuck on You Sketches - Winter Fun
Little Scrap Pieces Anything Goes


Thank you for stopping by!
Annette


Monday, January 16, 2012

Exploring Cricut Challenge #8- "Happy Birthday"

Good Morning Everyone! Today over at Exploring Cricut we are really having a fun challenge and hope you will decide to play along:) You are to create a birthday project with the colors: red, blue, green, yellow and white. Sounds easy enough right! Well, I have to be honest I originally had another card in mind, but I would have needed black and that wasn't a choice. So, I got to thinking and came up with this card. Now, for the eyes I used a navy which coordinated great with my paper:) I think this card is so fun!


Recipe:
Card base - Birthday Bash 5.68"
Papers - DCWV, stash
Elephant - Birthday Bash 1"
Circle - 4.23"
Sentiment - My Creative Time
Ribbon - Stash
Stickles - Xmas red, yellow
Red and blue ink


Thank you for stopping by and I'm excited to see what you guys create!
Annette


Friday, January 13, 2012

Valentine With Love!

Happy Friday Everyone! This is going to be a busy weekend around my house and I am hoping to be able to squeeze crafting in:)

Today I wanted to share a Valentine card that I made using the sketch from More than Favors. This was a fun one to do, but also a little tricky as the sketch is actually for a layout. I'm not sure about sizing, but I do really like the papers and especially the ruffle from Tim Holtz.


Recipe:
A2 size card
Papers - Authentique
Heart - Martha Stewart Elegant Cake Art 2.65"
Top Note - Elegant Edges 3.12"
Ribbon - Tim Holtz
Sentiment - Michaels
Crimper, Fiskars Punch

Entering:
More Than Favors Sketch Challenge #62
Hand Stamped Sentiments - Pleats or Ruffles Challenge #100

Thank you for stopping by!
Annette


Thursday, January 12, 2012

Snow?

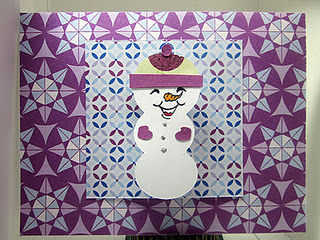
Good Morning! Well, we finally got some snow, but it really wasn't much to amount to anything. My youngest was bummed because she wanted to make a snowman and, of course, have a snow day. Last year we had so many that it was too much. Geez, sounds like we aren't happy:) Seriously, this is strange weather though. This weekend it will be back in the 40s and 50s.

Anyway, on to my card. I made this one with Gypsy Wanderings and my Cuttlebug. I love the ease of the Cuttlebug and embossing can really add that little extra. I also took Diamond Stickles and just added it here and there to the snowflakes to give them some shimmer too.


Recipe:
A2 card
Snowman - Gypsy Wanderings (sorry I forgot to save measurements)
Cuttlebug - Snowflakes and Divine Swirls
Paper - DCWV
Ribbon - Stash
Google eyes, black ink
Stickles - Diamond, Orange

Entering:
Tuesday Throwdown - Challenge #80 "Baby It's Cold Outside"
Pumpkin Spice Show your style (CAS)


Thank you for stopping by!
Annette


Tuesday, January 10, 2012

Loops Around the Page

Good Morning! Hope everyone is having a great day! Today I am sharing a birthday card that was so fun to make. I really like pink and orange together. It makes me think of warm weather.  We have had unseasonably warm weather so far for this area. Hopefully, we will get some moisture so the plants don't suffer.

Anyway, on to my card. I did want to mention that the gems I used were originally clear and I colored them with a copic marker to better match my card. I have to say that I use the copics more for coloring other items than paper. I really need to take a class so that I can use them for blending, etc.  I have new Stickles that I used and also Elegant Edges cartridge. This cartridge has so many pretty cuts.


Recipe:
A2 size card
Papers - DCWV
Loopy Edge - Elegant Edges
Girl - Forever Young
Sentiment - My Creative Time
Stickles - Firefly, Tangerine, Diamond
Gems, copic marker, pink ink

Entering:

Whimsical Designs On The Edge Challenge #37
Getting Cricky Simply Sunday Challenge "It's A Celebration"
Birthday Sundaes Challenge #38 Something New


Thank you for stopping by!
Annette


Monday, January 9, 2012

Color Twist on Snowflakes

Hi Guys! I wanted to share a card that I made that I think turned out kind of cool as I didn't use the traditional winter colors. I just got a new stack of papers from Authentique and thought I would be using more for Valentine cards, however, there was one pattern paper that had doily looking snowflakes that is really different.


I found some lace in my stash and thought it would help separate the snowflakes from Joys of the Season and the pattern paper. I used pop dots on one of the snowflakes as well. 

Recipe:
A2 size card
Snowflakes - Joys of the Season 1.75", 2.21",2.98
Papers - Authentique
Lace, ribbon 

Entering:
Cooking with Cricut Something New

Thank you for stopping by!
Annette

Friday, January 6, 2012

Sophie Skater Card

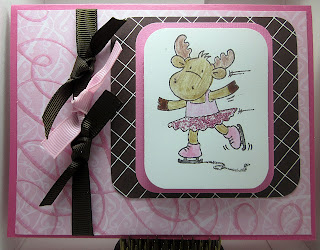
Happy Friday! I am so happy the weekend is here. No specific reason...just cuz I'm happy. I got to play with a new stamp that I think is super cute. Her name is Sophie from the Riley stamps (the moose). There are so many cute ones it is really hard to choose. Isn't she darling?


Recipe:
A2 card
Papers - DCWV Sweet Stack and stash
Ribbon
Stickles - Thistle, Silver
Pencils

Entering:
Joyful Stamper Anything Goes
Sassy Sites Free for All Friday


Thank you for stopping by!
Annette

Thursday, January 5, 2012

Exploring Cricut Daily Project - Snowflakes

Hi Guys! Today I have a project that is so simple and using items you probably have around the house. All the Christmas decorations are down and the snowmen and snowflake decorations are being put out. I needed something for my table and of course the Cricut came to the rescue. I remember doing projects with wax paper when I was little so I began my search. Of course, Martha Stewart had a great idea. I thought it was so pretty and hope you do too.

I took a picture of different lighting sources just so you could see which one you might like if you try the project.
LED battery lights
Tea lights


I was just planning on doing the table decoration, but the bag would be so fun for baked goods or just any present you might have.


This is one of the glass hurricanes that I used for the project. 


I chose the snowflake image from the Christmas Solutions. This is the layout that I made on the Cricut. The snowflakes were cut at 1.5". I filled up the page as I wasn't sure how many I would need for the 3 hurricanes. I ended up needing one and a half  12 x 12 sheets for the hurricanes and a half  12 x 12  sheet for the bag. If you do not have a gypsy you could also pick your image and hit the button auto fill. This will fill your page with as many as will fit on a 12 x 12 sheet for the size you've chosen.


This is what the images look like after they are cut for the hurricanes. I will say it was time consuming to get all the little pieces out of the snowflakes, but well worth it. The bag's snowflakes are just as pretty with the shadow feature. However, I do think for the hurricanes it is nice to have all the light shining through the cuts.

Here are the directions to fuse the wax paper:

These are the snowflakes used for the hurricanes.

I laid the grocery bag down first, then the wax paper and placed the snowflakes randomly. 


I then placed the next sheet of wax paper over the snowflakes. Make sure that both sheets of wax paper are cut to the same size. 


The next grocery bag was placed over the wax paper.


Lastly, the iron is set to the highest setting (no steam). I ironed over the bag to fuse the wax papers together with the snowflakes in between.

The wax paper is then trimmed to fit around the hurricane. Per Martha, you can measure the outer diameter, multiply by pi --3.14 and add 1/2" for overlap.  The wrap is then secured using double sided tape. The easiest way to do this is to place a strip the length of one of the edges of the paper. Begin wrapping with the side that doesn't have the tape. Adhere the taped side to the non taped side.

Another nice thing about this project is that the tape is not attached to the glass, so you can still use the hurricane for future uses.

Snowflake Bag:


I then switched to Tags, Bags, Boxes and More and chose the image on page 128 to cut. This bag was cut at 10.86". 


I added snowflakes from Christmas Solutions, but this time I used the shadow feature of the same snowflake I used for the hurricanes.  As you can see from the picture, I layed the snowflakes out before cutting the bag to assess how many I might need.  I then grouped the snowflakes together and opened a new page to copy them in. I cut the snowflakes first and ironed them onto the wax paper. Once that was done, I cut the bag out with my Cricut. I set my Cricut blade to 4, speed 3 and pressure 4 (this is the setting I use for vellum too). 

So there you have it. If you have any questions please let me know:)

Recipe:
Wax Paper
White Paper
Grocery bags
Glass Hurricanes
Double sided Tape
Iron
Snowflakes - Christmas Solutions 1.5"
Bag - Tags, Bags, Boxes and More 10.86"
Tea lights or LED battery operated lights
Ribbon

Thank you for stopping by!
Annette

Wednesday, January 4, 2012

Liebster Award!

Hi Guys!  I'm so excited to share that I got an award from Created by Cori.  Thank you Cori!!


It is now my turn to award it to 5 newbie blogs that I think are amazing! These blogs are all up and coming and have less than 200 followers. As a recipient it is now your turn to pick 5 blogs and share the love!

Here are the rules:
  • Choose 5 up and coming blogs of fewer than 200 followers to award the Liebster to.
  • Show your thanks to the blogger who gave you the award by linking back to them. If you are not a follower of theirs, that might be a nice way to show appreciation for the award.;)
  • Post the award on your blog.  Link back to the blogs you have given the Liebster to so everyone else can pay them a visit.
The award goes to:

Scrapping Girl from http://cricutcrazyscrapper.blogspot.com. She makes some really cute scrapbook layouts with Cricut cuts.

Lori http://blogginthecrafts.blogspot.com. She has some great crafts and cards to check out that are so simple and fun to make.

Tracy http://owlbecraftin.blogspot.com. She is currently a student who in her spare time makes darling,  whimsical cards.

Leah http://mycraftandchatcafe.blogspot.com. She has great tutorials showing how she puts her projects together. Her work includes crafts, cards and layouts.

Tonya http://ittybittyladybugs.blogspot.com. She has some super ideas using the Cricut as well. She just finished up 25 days of Christmas projects that are so fun. Check out her Dec. 2nd post about snow play. What a great idea!

These are some very talented ladies! Be sure to pay them a visit. I think you will enjoy getting to know them.

If you have been awarded the Liebster award, just follow the rules above remembering to choose bloggers with less than 200 followers that have caught your eye! 

Thanks again Cori !  


Annette


Tuesday, January 3, 2012

Don't Forget A Holiday Thank You

Good Morning Everyone! The holidays came and went in a hurry didn't they. My girls have today off and will return to school tomorrow. I love when they have breaks and we can all just slow down the pace a little. Tomorrow will definitely be back to business as usual. However, there is one order of business that couldn't be dismissed and that was the Christmas thank yous. It is always fun to see what designs they decide upon. This year was no different. Each girl chose what they wanted their card to be and I am happy to say they are done and in the mail.


I used a homemade wobble from a gift I won at Melody Lane Designs. It works great and so easy to make.


Recipe:
A2 Size Cards
Reindeer Winter Frolic 2,52"
Snowman - Winter Frolic 2.68", Peachy Keen Stamps
Papers - DCWV and scraps
Stickles - Red, Green, Silver
Orange and red markers

Entering:
She's A Sassy Lady Thank you cards
Paper Playtime Challenge #64 Something recycled
Jaihart: Sit Back, Relax and Look at all the Loveliness Projects your working on
Pink Cricut 1st link up what have you been up to


Thank you for stopping by!
Annette

Monday, January 2, 2012

Exploring Cricut Challenge #7 - Winter Wonderland

Hi Everyone! This is my first post as one of the new design team members at Exploring Cricut and hope you join in the fun. The challenge is Winter Wonderland. This could be a card, layout, or paper craft creating a winter scene or activity.  I chose snow skiing as my family loves this sport. We haven't gotten any snow here where I live and while I think it is beautiful, I also am glad when the roads are passable:)

I seem to keep grabbing for Winter Frolic when doing projects lately. It is so fun and has so many great cuts.


Recipe:
A2 size card 
Snow bunny - Winter Frolic 3.55"
Trees - Winter Frolic 3.22"
Papers - Scraps
Sentiment - The Cat's Pajamas
Snow Pen

Thank you for stopping by!
Annette