Tuesday, July 31, 2012

Showering Flowers

Good Morning! I had a lot of fun playing with this card. I really haven't used the Flower Shoppe much and thought it would be nice to work with it a little more. It is really very easy to use and I enjoyed being able to put different pieces together. I worked with the sketch from Mojo Monday.


I chose to stay with more of a monochromatic theme and like how this one turned out. I inked the edges of the flowers then spritzed with Perfect Pearls. I then embossed with clear embossing powder. I also added a little bit of Glossy Accents. Okay, so I got a little carried away:)


I was really random in the way that I altered the 2nd layer. The largest flower has more layers of clear embossing powder and more speckled. I heated the embossing powder and spritzed Perfect Pearls.  As in nature, nothing is the same and I thought it would be fun to make them all a little different:)

Recipe:
5" square card
Papers - Bazzill, DCWV
Flowers - Flower Shoppe 2.5", 2", 1.75"
Circle - George and Basic Shapes 2.75"
Scallop - Fiskars Punch
Sentiment - K. Andrews
Perfect Pearls, Glossy Accents, Clear embossing powder, China Blue and Tea Dye, Stick Pin

Entering:
Cardz TV Anything Goes
Paper Playtime Anything Goes
Mojo Monday Circle or Square
Word Art Wednesday Never Give Up

Thanks for stopping by!


Annette

Monday, July 30, 2012

Exploring Cricut Disney Dreaming Challenge

Hi Everyone! It is time for another challenge at Exploring Cricut. This is a fun one and I think you guys are going to enjoy it. The challenge is to create a card, layout or paper craft using at least 1 Disney character with your Cricut. There are great cartridges out there to use and I can't wait to see what you all come up with. I chose to make a congratulation card using Donald's girlfriend Daisy. She is so sassy!


I wanted my ribbons to pick up some of the colors from the pattern paper. I also wanted fairly tiny ribbons behind Daisy. So, I opted to take a white ribbon and color them different colors with markers. This can also be done with ink pads. Either way works great. It really helps to finish off the project you are working on.

Recipe:
A2 card base
Papers - Stampin' Up, DCWV and scraps
Daisy - Mickey and Friends
Sentiment - Getting Cricky
Ribbon, markers, Yellow Stickles, Glossy Accents

Thanks for stopping by and don't forget you have until Saturday to enter. There is a great prize too! You could win the i-magicut (ribbon cutter and burns ends to keep from fraying). Hope you join in the fun!

Annette


Tuesday, July 24, 2012

Hangin' With My Gnomies

Hi Everyone! I am stuck on this stamp set from Peachy Keen. They are just too cute! Today I used the sweet little gnome girls!  I got a new paper stack that has doublesided papers that are just so pretty:) I kept this very simple and just added the stamp and stickles to the paper.


The girls were individually cut out and adhered to the card.


Recipe:

A2 card base
Papers - My Yellow Bicycle (New Papers)
Gnomes - Peachy Keen (New Stamps)
Sentiment - Joy's Life
Markers, Chalk, Stickles, Glossy Accents


Entering:
Shopping Our Stash Something New

Thanks for stopping by!

Annette

Monday, July 23, 2012

New Blog Linky Party at My Crafting Channel

If you are somewhat new to blogging or you have less than 500 followers, and if you would like more exposure and to meet more crafty friends, you can link your blog to this party that is being hosted by My Crafting Channel.

Here are the rules:
* Be a follower of My Crafting Channel
* Post her button (available on her website) on your sidebar
*Create a new blog post titled New Blog Linky Party at My Crafting Channel  and visit her page to READ THE RULES before you link up. (Make sure that you mention that to others in your post, so that they don't get disqualified).
In your post, also make sure to mention that the Party is a way to get to more exposure, and find new inspiration, and mention and link back to My Crafting Channel.
* Go to My Crafting Channel to get the link up code, which you'll put into your post.  

* Start spreading the word so everyone can join.
* Visit, follow, and comment on as many as you can--maybe everyone's blog that joins the party? If you do not do the above your link will be deleted, because it's just not fair to those who work so hard linking up and showing love to the ones on the list. 
Link Up Party runs from Saturday 7/22 to Saturday 7/30
New Blog Linky Party at My Crafting Channel
Links are Moderated: Before Linking Up

Fairy Speedy Recovery

Hi! How is everyone today? I made a card for a friend of mine who had hip surgery. I am hoping this will bring a smile to her face:) I used all scraps to make this. I inked around the edges to soften the white. I used the stamp set from Peachy Keen for the fairy, sentiment and flowers. Stickles, pop dots and Glossy Accents were used on this card.


Entering:

Perfect Sentiments Anything Goes
Hiding In My Craft Room 5 or more layers
Simon Says Stamp and Show Hey Girl


Thanks for stopping by and enjoy the rest of your day!!

Annette


Sunday, July 22, 2012

Exploring Cricut Christmas Blog Hop Winner!

Hi Old Friends and New Friends! I just flew back into town from North Carolina and let me say I would rather be there because the weather is much more pleasant:) I am back in the furnace! But, with every negative, there is always a positive to be found. I am thankful for air conditioning:) I am also thankful for all of you too. I am excited to tell you who won the blog candy.

I want to thank all of you for joining us for the 1st Exploring Cricut Blog Hop. We had a great turn out and I am sure that we will do many more in the future. It was fun to include a challenge for all of you to begin your Christmas projects too:)

Okay, I'm done with my speech:) The winner of my Blog Candy, chosen by random.org:

is L.B. who said: "What a fun double layout. Love the fireplace! Great hop.

Yay! Please email me with your mailing address to send your goodies!

Thank you for stopping by and hope to see you soon with a new project!

Annette


Thursday, July 19, 2012

Exploring Cricut Project - Christmas

If you are looking for the Exploring Cricut Christmas in July go here. You have until Saturday, July 21st for blog candy and challenge:)
_______________________________________________________________________________

Hello Everyone! It is my turn to share at Exploring Cricut and I decided to keep with the theme of our challenge. I created a 2 page spread for Christmas. I thought I had finished all of 2010 Christmas and found some I had missed. 


I kept it fairly simply and will probably journal on the blue rectangle. I have to admit that my journaling has seen better days, especially on activities that we do yearly. I tend to just put the month and year.


One of the nice things about the Gypsy is being able to lay out the design prior to cutting. This can be done with DS or CCR. I was glad I remembered to cut my geometric shapes with the Gypsy. It was so much faster than me cutting and measuring the squares and rectangles. 


I added a red nose and black hooves with Stickles. 


Recipe:

12x12 2 page layout 
Elf - Paper Doll Dress Up 4.85"
Face - Peachy Keen Stamps
Merry Christmas - Simply Charmed 2.58"
2010 - Birthday Bash 1.31"
Reindeer - Paper Doll Dress Up 5.77"
Squares/Rectangle - George and Basic Shapes 3.25"
Patterned Paper Under Title - George and Basic Shapes 1.76"
Black Stickles, Xmas Red Stickles, Gold Stickles, Gold and black brads, Snow marker, black pen, ribbon, Divine Swirls embossing folder, chalk, Signo white gel pen, Glossy Accents

Thanks for stopping by!  Remember you still have time to enter the challenge and the blog hop for blog candy!

Annette

Tuesday, July 17, 2012

Love Birds


If you are looking for the Exploring Cricut Christmas in July go here. You have until Saturday, July 21st for blog candy and challenge:)
_______________________________________________________________________________


Hi! I needed a quick anniversary card the other day and created these sweet little birds. Hope you are all staying cool in your nest:)


Recipe:
A2 card size
DCWV Papers
Birds -Sweethearts 3.50"
Sentiment - My Creative Time
Signo White Gel Pen, Black Ink

Entering:

Thanks for stopping by!

Annette

Monday, July 16, 2012

Exploring Cricut Christmas in July Blog Hop

Welcome to the Exploring Cricut Blog Hop and Challenge! Today we are featuring Christmas in July. If you hopped from Sharon then you are in the right spot. If not, hop back so you don't miss a thing:)  You will see many wonderful projects by our Design Team and at the end you will be able to enter the challenge to show us a Christmas project. It can be a Christmas card, layout or a craft. Don't forget to use your Cricut for the challenge. Many of us are offering blog candy along the way so be sure to follow the rules to win some goodies!

So, I decided to create a Christmas layout that I did using a few cartridges. This is a 12 x 12 2 page layout mainly featuring Joys of the Season with a few other cartridges here and there.


I added Stickles throughout the layout to give some sparkle and shine. 


The wall hanging above the mantle was created using a Cri-Kit black glitter pen. I laid out what I wanted it to say on my Gypsy. I then used my Cricut with the Gypsy to create the writing and the cut. 

Recipe:
Family  Moments 2.75"  Gypsy Wanderings
Santa -Joys of the Season 4.74"
Tree - Joys of the Season 8.28"
Present - Joys of the Season 1.92"
Rocking Horse - Joys of the Season 2.24"
Drum - Joys of the Season 1.77"
Soldier - Joys of the Season 3.26"
Fireplace - Joys of the Season 4.23"
Stockings - Joys of the Season 2.03"
Wall Hanging - Create A Critter 1.48"
Lettering on Hanging - Lyrical Letters .31"
Bear - Joys of the Season 2.96"
Gems, Xmas Red Stickles, Green Stickles, Diamond Stickles, floss, brown and black ink

Here is my blog candy for you to win!!


Want a chance to win?
1. Make sure you're a follower.
2. Leave a comment on this blog post.
3. Leave a comment on all the blogs in this hop.

The deadline for my blog candy is Saturday, July 21st at midnight CST!

Your next stop is JESSICA

Sharon http://meemeescreations.blogspot.com/
Annette http://mymindsdustbunnies.blogspot.com/ HERE  

Thanks for stopping by and I hope you join in the fun!!

Annette

Tuesday, July 10, 2012

Chillin' With a Popsicle

Hi Everyone! I am super excited that I had some time to craft this morning and am entering this card into a few challenges. Hope your day is going well!


I used Doodlecharms to weld (with my Gypsy) the popsicle together to make a card. I added Glossy Accents, but forgot to add to the tongue for this picture. I love Glossy Accents and really think it just gives such a nice look. I also took chalk and went around the edges of the entire popsicle on the front and back of the card. I added the green card stock on the back of the card too so that it would be uniform to the front:)

Recipe:
Popsicle - Doodlecharms -6.33" for green cardstock and base measures 6.41"
Chillin' - Paisley 1"
Faces - Peachy Keen Happy Lashes
Chalk, Glossy Accents, Red marker, White Signo Gel Pen

Entering:
Fantabulous Cricut - Yummy, Yummy
Little Scrap Pieces - Sweet Summer


Stay cool and thanks for stopping by for a visit!

Annette


Monday, July 9, 2012

Ocean Scene

Hi! We finally got a break in the weather. Instead of the 100s it is now in the mid 90s and low 80s. It still feels muggy, but we'll will take it and continue to pray for rain. Hope you all are keeping cool today. I created this fun card with a fish theme. This water looks nice and cool. The pool water ...not so much. Too much like bath water. But, I digress on to the card.


The water background was created with Cuttlebug Divine Swirl. I ran it through the Cuttlebug and then added clear embossing powder. It gave it a nice shimmery look. 


I then added Stickles here and there giving it even more sparkle. The gellyfish and starfish I used Peachy Keen Stamps for their faces.

Recipe:
A2 cardbase
Water Scene - Pack Your Bags 4.09"
Faces - Peachy Keen Stamps Princess
Sentiment -K. Andrews
Cuttlebug Divine Swirls, Versamark Dazzle, Clear Embossing Powder, black ink, Black, Fruit Punch, Firefly, Diamond Stickles, Glossy Accents, chalk, Signo white gel pen

Entering:
Pile It On It's A Shore Thing
C.R.A.F.T.  Splashy Water Theme
Tuesday Throwdown Summertime
Totally Papercrafts Here Comes Summer
Catch The Bug Anything Goes

Thanks for stopping by and have a great day:)

Annette


Sunday, July 8, 2012

A Monkey and a Christmas Sweet!

Hi! I had some time today and created a card for a couple challenges. The Cardz TV challenge  was to  make a Christmas card with an animal on it .I'm also entering the Peachy Keen Stamps Challenge.  This challenge was to use chalk, which I added to the cute monkey's cheeks:) I chose to use one of my favorite cartridges, Paisley. The designs are so fun and whimsical.


I decided on the monkey with the lollipop but took the bow from the monkey on page 32 .  


Recipe:
A2 card base
Papers - DCWV
Monkey - Paisley 4.13"
Face Stamp - Peachy Keen Critter Faces
Sentiment - The Cat's Pajamas
Worn Lipstick, Gold, Diamond, Fruit Punch Stickles, fibers, button, micro black pen, white Signo Gel pen

Thanks for stopping by for a visit!

Annette

Friday, July 6, 2012

Sweet Remembrance

Hi! Just a quick post today and I am off to spend the day with family! Losing animals is so difficult for us and I wanted to make a card for one of the Bible Babes (that is what we call the women in my bible study). Her yorkie passed away and I was able to find a cute resemblance on CAC. 


I added Glossy Accents to the nose and mouth. Little gems were added to the collar.

Recipe:
A2 card base
Create A Critter 3.62"
Sentiment - Trade Fish Designs

Entering:

Hiding In My Craft Room Anything Goes
Joyful Stamper Inspire Me Friday
Word Art Wednesday -Blessings

Thanks for stopping by!

Annette

Thursday, July 5, 2012

Exploring Cricut Project- "Sunny Thoughts"


Hi Guys! I'm excited to share today at Exploring Cricut a card that I made using a different technique for me. It is called iris paper piecing or paper folding. I really liked using the negative space from my Cricut cut to create something unique in the middle. For my sun I thought it would be fun to bring in different shades that you actually see when the sun is coming up or setting. 


There are quite a few you tube videos out there as well as directions and this is how I chose to make mine. I used the square pattern from this site to create my iris. I chose 4 patterned papers cutting them at 1 1/2" 
wide and 3 1/2" to 4" in length.

Each section is numbered and you will begin with #1 which is the outer area of the square and work your way in. A great tip I learned was to make a chart like this:

Color 1:  1,5,9,13,17,21,25,29
Color 2:  2,6,10,14,18,22,26,30
Color 3:  3,7,11,15,19,23,27,31
Color 4:  4,8,12,16,20,24,28,32

I named my colors based on what my pattern paper looked like. This helped me keep track so that I would know which paper came next as I was going around the square. 


The strips of paper are then folded in half. Make sure you keep the fold to the inside of the iris. It is best to use papers that are lightweight; as this is very heavy once assembled. My papers are from a DCWV 180 sheet stack.


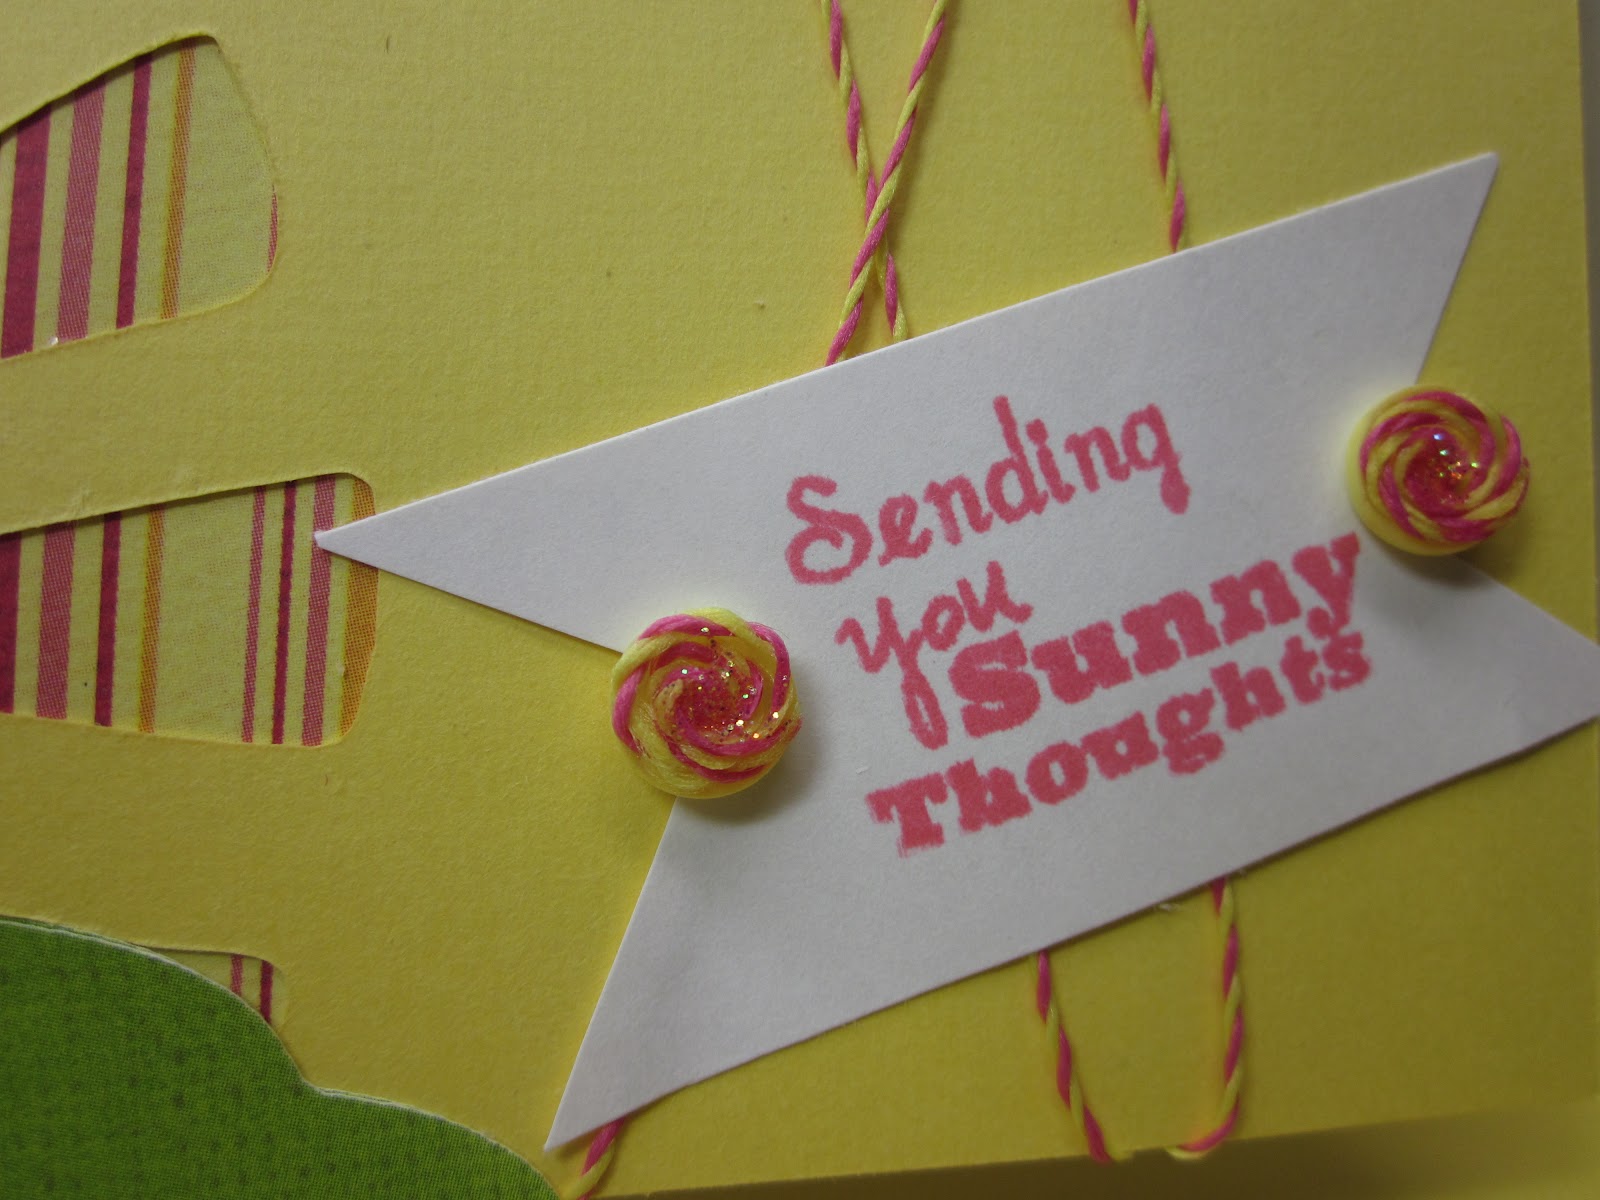
This is the finished product. You should also remember that you are working on the back side of the image. It is helpful to tape the sheet of paper to a work surface  to eliminate shifting while working. As you lay the strips of paper down you can begin to attach them to each other with tape in the corners. I wouldn't tape your folded papers to the square because it will make it harder for you to remove the pattern when finished. 


I created the embellishment on the end of the sentiment by taking 2 buttons and gluing twine to each of them. I then added Stickles to the centers.

Recipe:
Sun negative - Paper Dolls for Everyday 4.88"
Hill - Paper Dolls for Everyday 1.21"
Sentiment - K. Andrews
Twine, Stickles, Worn Lipstick ink,


Thank you for stopping by and remember you have until Saturday to enter our challenge!

Annette

Tuesday, July 3, 2012

Shine On!

Wow! The sun is really shining bright where I live. I am entering this cutie in the Peachy Keen Challenge. Hope you all have a wonderful and safe 4th of July:) Be sure to check back on Thursday when I show you what I did with the negative of this sun cut!


Recipe:
A2 cardbase
Papers - Citrus DCWV
Sun-Paper Dolls for Everyday 4.88"
Face Stamp - Peachy Keen
Sentiment - K. Andrews
Beads, Glossy Accents, White Signo Gel Pen, Black ink, Ribbon, Chalk

Thanks for stopping by!

Annette

Monday, July 2, 2012

Exploring Cricut - Red, White and Blue Challenge

Hi Crafty Friends! Today is a new challenge at Exploring Cricut. The challenge is to make a card, project or layout with red, white and blue for the 4th of July or Canada Day. I decided to go with the upcoming holiday theme, 4th of July! It has been so hot here that we may not get to do fireworks this year because of all the dryness. 

It would be awesome if it rains before Wednesday; but I don't think we will have any luck with that. We always have a fireworks ban in the city limits, however, we are concerned to even go out in the country because of the fire hazard. Well, there is still the picnics and games to celebrate the holiday. 

For my project, I chose to make a card. I'm not sure you can see it in the picture, but I added Glossy Accents to the handle and the actual bell. It really gave it a nice shine. 


Recipe:
A2 cardbase
Papers - DCWV and Stampin' Up
Bell - Stretch Your Imagination 4.41"
Sentiment - Pink By Design
Ribbon, Glossy Accents, Black Ink

I always love to see what you guys create and this time is no different. I hope you decide to join in the fun. It looks like an awesome prize you could win too!!

Thank you for stopping by and I always love your comments!


Annette