Thursday, August 30, 2012

Exploring Cricut Project - Back to School 2012

Good morning! Glad you popped over today as it is my turn to share at Exploring Cricut. I have a 2 page layout of my girls on their first day of school. I used quite a few cartridges for this one and really had fun with the apple theme.


I used white on the eyes and then Glossy Accents over the entire eyeglass.

Recipe
12 x 12 2 page layout
Apples - Doodlecharms .95", 2.37"
Catepillar Create A Critter 2.46"
Face on catepillar - Peachy Keen Stamps
Border - Martha Stewart Elegant Cake Art 1" x 12.25"
Pink Tag - Tags, Bags, Boxes and More 3.29"
Rosettes - Ribbons and Rosettes 1"
Creme note - Storybook 2.08"
Sentiment - My Creative Time
Metal sentiment - Making Memories
Black and Diamond Stickles, Glossy Accents, ribbon, black ink, white pen

Thanks for stopping by and remember, the challenge ends Saturday, September 1st.

Annette

Tuesday, August 28, 2012

Bee Family

Good Morning! today I have a card I created for a challenge at The Cricut Chirp. You are to use any sort of bug, bow and a Cricut cut. I used Create A Critter for the cute little bee family and their house. I used Stickles and made a cute bow out of twine.


Hope you all have a great day and thanks for stopping by!

Annette

Monday, August 27, 2012

Exploring Cricut Challenge Back To School

Good Morning! There's a challenge for you at Exploring Cricut today! The theme this time is back to school. You can create a card, layout, or paper craft using the bright primary colors red, green, blue, orange, yellow, purple, white, and black. You have to use your Cricut, must be a new project and you have until Saturday, September 1st to get your creation in. 


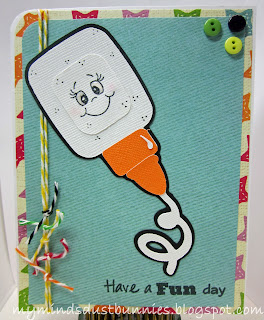
I created a card using Simply Charmed today. I always liked getting new supplies for school and my kids do to. Everything looks fresh and ready to go:) For the sentiment, I cut the word "fun" out from another stamp. I then laid the words together on the block to get them even before stamping. 

Recipe:
A2 card base
DCWV and American Craft Papers
Glue bottle - Simply Charmed
Sentiment - K. Andrews
Twine, buttons, Glossy Accents, black pen

Thanks for stopping by and hope to see your new creations too!

Annette

Friday, August 24, 2012

Happy 1 Year To My Blog!

Wow! One year went by really fast. I have met some wonderful people along the way and I feel very blessed. I appreciate all the comments and followers. It is so refreshing to be surrounded by people that enjoy creating!!


Today, is also the drawing for the My Memories Giveaway. So without further adieu, the winner, chosen by random.org is:

R. Jarvis who said she would like to scrapbook her summer vacation and the Little Helper kit!


Recipe:
A2 cardbase
Cake - SKdigis
Sentiment - Joy's Life
Stickles, Copic Markers, Glossy Accents, twine

Entering:
Send A Smile 4 Kids Challenge  Anything Goes 4 Kids
No Matter Which Challenges Anything Goes
Whoopsi Daisy  Include a Sentiment 

Thank you for stopping by and have a great weekend:)

Annette

Wednesday, August 22, 2012

Pink with Sprinkles!

Looking for the My Memories Giveaway go here.

Hi! Today I am playing with another SKdigis image and entering in a challenge as well. I think the kids are starting to get in the groove of school. I can't believe my senior has 4 tests this week. It hasn't even been a full week! No feeting getting wet there. Just jumping right in and so I am with my projects.

I have quite a few on the table right now and am trying to be very organized. Since my blog's anniversary is Friday, I decided on this sweet cupcake image. This was really a fun one to color and adding the Stickles just made it pop.


I kept it CAS following the image from Mojo Monday.

Recipe:
A2 cardbase
Cupcake - SKdigis
Paper - scraps (really trying to clean out)
Copic markers, Stickles

Entering:
Mojo Monday Sketch #255

Thanks for stopping by!

Annette


Tuesday, August 21, 2012

Snappy Thanks!

Looking for the My Memories Giveaway go here

Good Morning! Hope everyone is off to a great start today. I have a cute little critter to share with you today. My stash of cards is low on thank yous and I thought I better get busy. 


I didn't have the right saying so I took 2 different stamps and created the sentiment that I wanted by masking. I actually like that they are not the same font:)

Recipe:
A2 card base
Papers - Basic Grey
Turtle - Create A Critter
Sentiment - My Pink Stamper for the "Snappy", Stampin' Up for the "Thanks"
Scallop Circle - Studio G
 Black Ink, Ribbons

Entering:
Craft Your Days Away  Challenge #52 Anything Goes
Hiding in My Craft Room Challenge #59 Limited Layers


Thanks for stopping by and have a great day!!

Annette


Monday, August 20, 2012

My Memory Suite Giveaway!

Hi Everyone! Today I want to talk about a digital software review for My Memories Suite. I was contacted by them to give my opinion on what I thought of their product. So, since this is my blog's anniversary week I also thought it would be fun to do a giveaway!! The company is so generous to offer my readers a copy of the software too!

I have dabbled a little in the digital software world, but really I must admit, I am a paper/glue kind of gal, but I was intrigued to give it a whirl.  This was such an easy program to work with. They have very pretty templates to choose from and lots of inspiration on their blog to check.

Here is a video so you can see what the software actually looks like.


And a quick page that I did with images that came with the package. I was able to pick the layout I wanted and then choose a picture of my kiddos and dropped it in within minutes. I was also able to take elements away if I chose not to use them. There were some flowers over the mat that would have covered my daughter a little bit and I was able to just delete them very easily:)


So, what do you need to do to win this software? Well, leave me a comment letting me know what you would like to accomplish with My Memories Suite

For extra chances, follow my blog and go to My Memories Suite blog telling me which is your favorite digital pack.

Giveaway will close Thursday, August 23rd and winner announced August 24th on my blogaversary!!!
Don't forget to leave me a way to get a hold of you if you win:)

And finally, I have a code that you can use to get $10 off of the price of the digital software, plus $10 in free credit to the store: STMMMS55233


Thanks for stopping by!

Annette

Friday, August 17, 2012

Summer Buggy Thanks!

Happy Friday!! Are you all ready for the weekend and by the way where has August gone? My kids started school yesterday and they seem to be off to a great start. Today, I have a thank you card with another SKdigis image to share. This is a freebie over at Sonia's site for you to try. Her images are cute, cute and fun to work with!!


Recipe:
A2 cardbase
Papers - Scraps, DCWV
Bug Image -SKdigis
Creme Mat - Elegant Edges 3"
Firefly and Thistle Stickles, black ink, Copic markers

Entering:
DL Art - Friends
365 Cards - Super Sketchy Sunday
Anything Challenge - Summer Days
Hiding In My Craft Room Super Scraps
The Cricut Chirp - Anything Goes

Thanks for stopping by and have a great weekend!!

Annette

Thursday, August 16, 2012

Exploring Cricut Thursday Project - Altered Tin

Good Morning! Glad you came to see me as it is my day to share at Exploring Cricut, Today I decided to up cycle an Altoid tin. There are so many uses for these and they are the perfect size to fit in purses, back packs, etc. or sitting out on a table.


The Matryoshka dolls were made with the Paisley cartridge and Peachy Keen faces. I used Mod Podge over the dolls as well before adhering the crocheted flower.


This is what I started with. As you can see it is pretty worn, but it will be fixed up in no time.


I chose my papers and drew an outline around the top first. I cut this out and inked up the edges with a black stamp pad. I used a sponge brush to paint on the Mod Podge to the tin and then the paper making sure I got the edges really good.  It's not a bad idea to use a brayer to really get the edges nicely. The picture above shows the pencil outline of the bottom of the tin. As you can see from the outline it is a little bit on the outside of the tin. You can either sand this down or just cut on the inside of the pencil line 


Once you have the top and bottom done you can move on to the sides.  The measurements for the top lid rim was 1/4" and the bottom rim was 3/4". However, you should double check your tin to make sure that is your measurement too. When you are adhering the paper around the hinge use an Exacto knife to cut a little slit on either side of hinge and tuck the paper on the inside. This will give a cleaner, finished look to your box.


The measurement for the inside papers are the same as the outside top and bottom. I tried to put paper around the top of the lid on the sides, however, it was too thick for the lid to close. This was all adhered with Mod Podge and then coated on the top as well.


I glued a pink button on the side with Glossy Accents mainly for decoration. I also think these would look cute with covered wooden balls on the bottom.

Recipe:
Altoid Tin
Authentique Papers Uncommon and Bazzill
Matryoshka Dolls - Paisley 1.96", 1.81"
Faces - Peachy Keen Princess Faces
Crochet Flower - handmade
Mod Podge, black ink, buttons, creme twine, Stickles Fruit Punch and Cotton Candy

Don't forget you have until Saturday to post your project for the Exploring Cricut challenge.


Thanks for stopping by!

Annette

Tuesday, August 14, 2012

Gardening Nut

Hi! So happy today because it is raining a really nice steady rain:) We haven't had decent rain in I don't remember when! I have a quick card to share from Bugaboo Stamps. I have someone very close to me who loves to be out in the yard. My husband calls her "the plant whisperer". I saw this little nut image and immediately thought of my buddy. I'm also entering into a couple challenges today.


Once I colored the nut, I used the blender to add some texture to it. 

Recipe:
A2 cardbase
Papers - Stampin' Up and My Yellow Bicycle
Image and Sentiment - Bugaboo Stamps
Copic Markers, Stickles, button, ribbon

Entering:
Catch The Bug Blog Sketch #117
Party Time Tuesdays Garden Delights


Thanks for stopping by!

Annette

Monday, August 13, 2012

Exploring Cricut Challenge - "Cricut Choice"

Hi! Happy Monday! Today is a new challenge at Exploring Cricut. This is an Anything Goes Cricut challenge with a twist. You have to use 2 Cricut cuts and a monogram. Isn't that fun! I decided to create a pretty cover for the back of my cell phone.


This was super simple. First, I picked out my papers and layed the cuts out on my Gypsy. I then laid the patterned paper face down and the phone cover down on top of it to trace an outline. I also traced two holes where the camera and speaker are. Removing the cover, I used an X-acto knife to cut the patterned paper.

I then used Mod Podge to adhere the papers to the phone. I also went over the top of the papers with the Mod Podge. The flower has Stickles in the center of it.

So there you have it! An inexpensive way to jazz up your phone. Hope you enjoyed  this and maybe it inspired you to cover your phone too:)

Recipe:
Papers - Basic Grey, Bazzill
Monogram - Lyrical Letters 1.76"
Banner  - Lyrical Letters .79"
Flower - Martha Stewart Elegant Cake Art .90"
Mod Podge, Diamond Stickles

Okay, now it is your turn! You have until Saturday evening to enter your project. Don't forget to use your Cricut:) For more inspiration, check out my DT sisters and brother too!!


Thanks for stopping by!

Annette


Friday, August 10, 2012

A 12th Birthday!

Good Morning! Yay, it's Friday:) This is the last weekend before school starts and I am so not ready. Once again life is going way too fast for me.  I worked on my youngest pages from her birthday last year the other day. Her favorite color is blue and she thinks Hello Kitty is so cute. I do too. 


I realized when I was putting these pages together that her candle was a 6. What? I had forgotten all about that. I think my reasoning was it was half of 12 and hey, it's a candle right. She was a good sport about it:) 


I learned a really great tip from Mary at Cardz TV when putting Hello Kitty together. The trick is to cut out the silhouette and just lay the pieces in. Oh my, this was so much easier! So, thank you to Mary:)


The circles inside the flowers came from the large scallop circle. The paper was double sided so I was able to use the other side too.

Recipe:
2 page 12 x 12
Red Strip Scallop - Ribbons and Rosettes 1.04"
Circle Scallop - Elegant Edges 10.71
Hello Kity - Hello Kitty Font
Flowers - Hello Kitty Font 4.08"
"12" - Hello Kitty Font 3.46"
Circles - George and Basic Shapes 3" and 3.46"
Rectangle - George and Basic Shapes 3"
Happy Birthday - Create A Critter 2.55"
Yellow Stickles, Black ink, DCWV Stickers, White Signo Pen

Entering:
Scrap It Girl Numbers
For Fun Challenges Birthday
Mema's Crafts Anything Goes with a Twist of Red

Thanks for stopping by and have a great weekend!

Annette

Monday, August 6, 2012

What's the Buzz?

Hi Everyone! Glad you came over for a visit:) I have a card today using an image from SKdigis. Sonia's images are super, super cute:) This little bee was crafted by paper piecing her together. She was really easy to work with and I hope you enjoy her as much as I do:)


Recipe:
A2 card base
Papers - Bazzill, My Yellow Bicycle, Vellum
Scallop Circle - Elegant Edges 
Circle - George and Basic Shapes
Bee In Flower - SKdigis
Sentiment - Joy's Life
Diamond and Cotton Candy Stickles, Glossy Accents, Twine

Entering:
Clearly I Stamp Things With Wings
That Craft Place Blog Things With Wings

Thanks for stopping by and go check out SKdigis! Would love to see what you create too:)

Annette


Saturday, August 4, 2012

Would You Like To Try Some Free Stamps?

Hi! I wanted to let you know that Sonia has a couple freebie cuties for you to try at her website SKdigis. One of my DT Sisters has examples for you to check out! So cute!! I can't wait to give this a try. Don't forget we will have challenges starting September 3rd!! Yay:)


Have a great weekend!!

Annette


Friday, August 3, 2012

Happy Hippo!

Hi Everyone! Lots of fun news today. First, I found out on Tuesday that I made DT for SKDigis. This is a new challenge blog for digital stamps and a place to purchase some darling images. Our first challenge will be September 3rd. Go check out her cool stuff:) 

Shout out to PK Stamps - I made Top 3 for my Corny Card! Thank you so much! Love my Peachy Stamps.

So, on to my card I created. I think this hippo is oh so fun from Birthday Bash. Doesn't the ice cream look real? Glossy Accents to the rescue. I added Stickles to the butterflies and the cherry.


School is starting in a couple weeks and I'm trying to savor these last days with my family. I hope you all are doing the same thing!

Recipe:
A2 card base
Papers - Echo Park, Bazzill
Sentiment - Echo Park Sticker
Hippo - Birthday Bash 3.50"
Glossy Accents, Stickles, Cuttlebug Argyle folder

Entering:
Cooking with Cricut  BFF Bingo Glitter, Embossing Die Cut
Tuesday Alchemy Ice Cream Social
Celebrate the Occasion I Scream for Ice Cream

Thanks for stopping by and have a great weekend!!

Annette


Thursday, August 2, 2012

Exploring Cricut - Oh Minnie!

Hi Guys! I am happy you came to visit. It is my turn to share at Exploring Cricut and I decided to do a card with Minnie Mouse.  The last time we went to Disney World Minnie had a beautiful blue dress on for The Year of  A Million Dreams. She was so cute and sparkly!


I thought it would be fun to capture this memory on a card to wish my youngest daughter good luck in the coming school year. I used Stickles on her dress and bow. I also used Glossy Accents on her eyes and tongue. Liquid Pearls was used on her sash around her waist.

Recipe:
A2 card base
Papers - DCWV, Bazzill, Authentique and stash
Minnie - Mickey and Friends 3.5"
Sentiment - My Creative Time
Diamond and Silver Stickles, Glossy Accents,Perfect Pearls, and black ink

Remember you still have until Saturday to enter our challenge. Thank you for stopping by and enjoy your day!


Annette

Wednesday, August 1, 2012

So Corny!

Hi! Today I just have a silly card for you:) My sister in law had elbow surgery awhile back and is now ready to begin therapy. Her range of motion is limited and this is not so much fun at all. She told me the other day that she had certain goals that she was trying to achieve. One of them was to be able to eat corn on the cob with 2 hands. I decided to send her a card and wish her luck on getting back to doing everything she could before her accident.


Recipe:
A2 card base
Corn - George and Basic Shapes 3.25"
Corn Husk - Walk In My Garden 10"
Face - Corny Faces Peachy Keen Stamps
Sentiment - My Creative Time
Glossy Accents, Chalk, White Gel Pen, Rub Ons, Buttons

Entering:
Peachy Keen Stamps Challenge Anything Goes
Die Cuttin' Divas Anything Goes
Party Time Tuesdays Anything Goes

Thanks for stopping by!

Annette