Showing posts with label Craft. Show all posts

Thursday, August 28, 2014

Exploring Cricut and More- Seek the Heights

Hello! Hope your day is off to a great start! I am sharing at Exploring Cricut and More today and have a fun project that my oldest wanted to make for her sorority little. 

This was super easy to make and the reason was contact paper. Now you can use vinyl too, but let's face it contact paper is more reasonable when you are just using it for a mask to paint.

I created this balloon using an svgcuts.com image and AR Cena font from my computer. I wanted the sentiment to curve around the balloon and wasn't sure how to do this. I found this video on youtube.com and it was perfect.


I separated the image pieces for the balloon so that I would have masks for each part. Acrylic paint was used on the canvas and dried very quickly. The contact paper worked great. It didn't pull the paint up between colors and it definitely gave nice crisp lines. Just make sure you get all the bubbles out and it lays down flat before beginning to paint over it.

This was a 12 x 12 canvas and the image was almost 9.5" tall with the letters measuring a little over 1" tall. I did add a little more space between the letters. Under Text Style, at the bottom, is a slider bar that says character spacing. You can choose how close or far apart you would like your letters.

Remember to join in our challenge this week! 

Thanks for stopping by!

Annette

Thursday, March 13, 2014

Exploring Cricut - Spring Anyone?

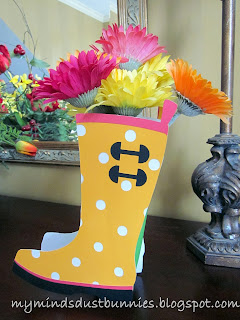
Hello Everyone! The warm air is teasing us these days and it needs to stay put.  I definitely am ready for the Spring/Summer season. It's my turn to share at Exploring Cricut and More and I was looking for a project that would help me think warm thoughts. I came across this cute vase at Lettering Delights. It happened to be a free cut, which always is a plus in my book.


You can cut this using your printer (using the color chosen already) or change the colors to your liking.  I chose to change the colors a little bit and here's how I did mine. 


I clicked on the Trace button (you can also find this under Object button and scroll down to Trace). I then clicked the Select Trace Area. I outlined the area that you see below. Once this was done I hit the Trace button.


The boot outline will then change to a red color instead of yellow and you can take your cursor and separate the yellow boot from the red outline. This outline is what you will use to cut with the color of your choice.

I then proceeded to do this with all of the cuts. You will also need to remember to cut two boots for both sides. To save on paper waste, when cutting the black and pink, I moved the outlines closer together before cutting. 

I put silk flowers in mine, but if you add some support to the bottom of your box a small bud vase will fit very nicely instead. This would make a sweet gift for any occasion.

Recipe:
12 x 12 American Craft Papers
Wellie Box - Lettering Delights
Silk Flowers

Hope you enjoyed my project and thanks for stopping by!

Annette

Monday, March 10, 2014

Exploring Cricut Challenge - The Luck of the Irish

Good morning everyone! It's time for a challenge at the new Exploring Cricut and More. Create a card, layout or project to celebrate St. Patrick's Day. Your project must include a shamrock. Remember you can use any machine to create your project:)

I decided to create fun gift boxes for my kids to celebrate the holiday! 


The sentiment was made with the Silhouette Cameo. I chose black and sized to fit exactly in the scallop circle. 


Did you know they have teeny tiny Starbursts minis unwrapped. They are so cute and a bunch fit into my boxes!!


As you can see, the box is shaped like a triangle and the shamrocks are glued to the top and bottom of the box. There are 2 separate triangles that are glued to the top and bottom of the triangle sides for added support to the box. 

Recipe:
Silhouette Cameo
Clover Box - Silhouette Store
Scallop Circle - Silhouette Store
Sentiment - Skdigis
Scor Tape

Thank you for stopping by and hope to see some of your great projects too! Check out my DT sisters for even more inspiration for the upcoming holiday:)

Annette

Monday, February 24, 2014

Exploring Cricut - Bag Box or Tag Challenge

Hello Monday! It's time for another fun challenge from Exploring Cricut. This week we are asked to create a bag, box or tag and include 1 ribbon in your project.

I created a box from Tags, Bags, Boxes and More and had warmer weather in mind when I chose this particular cut.  I used my Gypsy to size the box on a 12 x 12 mat. I also hid all the cut marks. It would be nice if the marks only scored the paper, however, it gives a cut that I don't like on the finished product. I used my Martha Stewart scorer to crease the areas that need to folded.


This is what it looks like after it is done on the Cricut. The flower pieces have a slit in each of them and the flower slides together. I placed the gold flower on top of that with a glue dot to give a little more dimension. The gold flower was created using the tag image on the same cartridge. 


Recipe: 

Box and Flower - Tags, Bags, Boxes and More 9.12", 265"
Button, Twine

Hope to see your great creations too:) Thanks for stopping by!

Annette


Thursday, December 5, 2013

Exploring Cricut - Thursday Project

Hello! Well, the week is almost over and it is my turn to share a project with you at Exploring Cricut. This is another CAS if you are looking for a fun gift for someone. Turtles are a favorite for the recipient of this gift, but the possibilities are endless.


I purchased the frame at Michael's with a coupon of course:) I used left over scraps, which is always a plus in my book. I chose to not add googly eyes to the turtle because the fit of the glass made it too tight.  Stickles looked to harsh for me. I might suggest if you decide to create this to leave the glass off if you really want something on the eye or get a frame that has more space between. 


I measured the inside of each frame and used my gypsy to create a rectangle of the same size. You can also do this in CCR. Remember to take your link off so that you can change height and width. I then was able to size my turtle exactly to fit inside of the frame.
I backed the turtles with white paper and think it really makes the colors pop. Sorry for the picture not being as bright. Cloudy weather here does not make for great pics.


Recipe:
Turtle - Walk In My Garden 
Papers - Scraps
Frame - Michael's

Thanks for stopping by and remember you still have time to create a Christmas card to enter our challenge!!

Annette


Thursday, July 18, 2013

Exploring Cricut - So Blue

The blog hop is still going on for a chance to win a prize go here:)

The week has flown by and it is my day at Exploring Cricut. Around my house we are busy getting ready for college. I found this idea on Pinterest and thought it would be so fun to try with my Cricut.


I first painted the embroidery hoop that I got at Michael's with some acrylic paint. I sent this aside to dry, which was super quick, promise.


Here are the supplies I started with. If you decide to do this 3 was not enough for the floss and I had to run and get another one. I didn't split the floss thread as we wanted it to be as thick as possible. So, they were threaded as is.  I had some left over muslin that I cut down to size and placed in between the hoops. I adhered the flower with a little bit of tape runner as this was just to keep it in place.


Pay close attention to your flower pattern. I should have started on the inside instead of where my needle shows in this picture.  By sewing the middle section first this will allow your flower to have a cleaner finish for the end result. I then added some french knots to the middle and Stickles with buttons for some more sparkle. This is lightweight enough to go on her wall and the sparkle will hopefully catch the light:) 

Recipe: 
Flower - Martha Stewart Elegant Cake Art
Embroidery Hoop 10", Floss, Stickles, buttons

The Christmas challenge ends on Saturday and we sure hope you decide to join in the fun!! 

Thanks for stopping by!

Annette


Thursday, July 4, 2013

Exploring Cricut - Flower String Art

Happy 4th of July!  It is my turn today to share at Exploring Cricut. I decided to share a project my daughter, Emma, created using the Cricut and string art. Do you all remember doing this? I do, and boy, the Cricut would have made this so much easier!!

She is getting ready for her freshman year at college and working on projects to decorate her dorm room. I think she hit a winner with this one. She chose a flower from Cindy Loo.


She got a board from Michael's and painted it yellow on top and green around the edge. Using acrylic paint this dried very quickly.


Lay newspaper down and also something cushy underneath your project. We put some placemats and a laptop sleeve to protect table and give some cushion when hammering. The next step was to lay the negative of the flower on top of the wood for placement.


As you can see the nails were hammered around the edge of the negative. The curves took more nails/sq. inch to make sure there would be a good curve. The nails were from Home Depot - Wire Nails #18 x 3/4". They had a very nice head to work with and the string stayed put.


Tie your floss in a knot around a nail head to start. Here you can see Emma started with the edge of the pink flower and once done began zigzagging the pink through out the flower. There really is no wrong or right way to weave; whatever looks good to you:)


She continued that process  with the dark pink and green. When finished weaving tie a knot around another nail head and tuck under floss. Once the stringing was finished, I added green stickles to the nail heads around the green area; and pink stickles around the pink area. This really gave it a nice shimmer:)


Recipe:
Flower - Cindy Loo 10"
Yellow and green acrylic paint
Oval frame, embroidery floss in 2 shades of pink and 1 green
Green Stickles, Cotton Candy and Fruit Punch Stickles

Thanks for stopping by and don't forget to enter our challenge by Saturday!

Annette


Thursday, May 23, 2013

Exploring Cricut - Graduation Cupcake Stand

Hello! It is my turn to share at Exploring Cricut and I am so excited to do so. My house has been a whirlwind over the last week with graduations and winding down the school year. We have a busy weekend coming up with dance performances. It is all so exciting  but I will be so ready to take a breather.  I'm sure you all are feeling the crunch too with the season. 

I have a fun project and oh so simple for those last minute ideas in decorating for graduation parties. I created this cupcake stand and wanted to share with you. I used my Cricut for the graduation cap and lettering. I adhered the cap, with a hot glue gun, to a popsicle stick that I painted white. It slipped nicely in between the notch at the top and I didn't even have to glue it in place.   


This cake stand holds approximately 48 cupcakes and is made out of styrofoam. I added the polka dot ribbon and the tulle at the bottom using a glue gun to adhere. 


You may remember that I had made candy tags for the table and I thought I would show you what the finished buffet looked like.


It was a great party and people really enjoyed the fun candy and cupcakes! Remember you have until Saturday to enter our challenge at Exploring Cricut!

Recipe:

Cap - Everyday Pop-Up Cards
"Class of" - Wild Card
"2013" - Birthday Bash
Tulle, ribbon, Yellow Stickles

Thanks for stopping by!

Annette