Showing posts with label Exploring Cricut. Show all posts

Thursday, April 10, 2014

Exploring Cricut and More - Easter Surprises

Happy Thursday and welcome! It's my turn to share at Exploring Cricut and More and I decided to show you some more Easter goodies that might help inspire you as you get prepared. I can't believe that it is next week and I'm not ready!!  If you're like me, this might help you get inspired. I am in love with Lori Whitlock's 3d box cards. There was a sale recently for 1/2 off everything at the Silhouette store and I stocked up. Needless to say you will be seeing more of these cute cards.


I really like that they will fit in an A2 or 5x7 envelope, so no extra postage! All the guess work is already done for you. It's just a matter of picking the papers that you want to use.


I also added paper to the back of the card. I just duplicated the images and resized them. This is a great spot to write a note, but I think will look a little dressier with the matted finish.


I did add some more elements to the card just to make it more my own. The extra bow and extra scallop were added. Stickles was also added to the pink bow.

Recipe:
 Silhouette Online Store Lori Whitlock #56147 A2 box card Easter Basket
Fruit Punch Stickles
Scrap Papers
Sentiment - My Pink Stamper

Thanks for stopping by!

Annette


Thursday, March 27, 2014

Exploring Cricut - Spring!

Hello! I'm glad you stopped by today as it is my turn to share at  Exploring Cricut and More. We just got done with Spring Break and I always feel like once that comes and goes I'm ready for summer. But, we still have a few more weeks of school left and it is definitely not warm enough around here. So, to keep me thinking warm thoughts, I decided to create a spring inspired card.


The wreath could be cut as is or you could cut with your own colored papers. I decided to do both for this card. I enlarged the colored flowers to fit the size I needed and then print and cut them. For the wreath itself, I used papers that I had in my stash. To do this I traced each piece and then cut out with my Cameo.  I added Stickles to the flowers and wreath.  There was also a base to the wreath that I did not to use. 

The tag with sentiment was an SVG of Vintage labels and I apologize but I can't remember where I got them. I did see at the Silhouette store that there are some cute ones from Jillibean Soup that look very similar.  I changed the verbage on the tag by ungrouping the image. Once that's done I could add any sentiment I chose. It is nice to do this, especially if you don't have a stamp in your collection with just the right words to use:)

Recipe:
A2 cardbase Stampin' Up
Pattern Paper - My Mind's Eye
Wreath - Silhouette Store #56497
Twine, Fruit Punch, Yellow, Diamond Stickles, Black Ink

Thanks for stopping by and you still have time to enter our challenge until Saturday!

Annette

Thursday, March 13, 2014

Exploring Cricut - Spring Anyone?

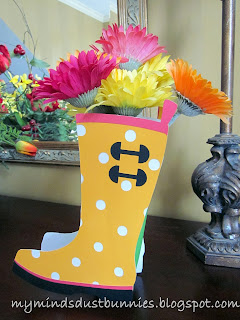
Hello Everyone! The warm air is teasing us these days and it needs to stay put.  I definitely am ready for the Spring/Summer season. It's my turn to share at Exploring Cricut and More and I was looking for a project that would help me think warm thoughts. I came across this cute vase at Lettering Delights. It happened to be a free cut, which always is a plus in my book.


You can cut this using your printer (using the color chosen already) or change the colors to your liking.  I chose to change the colors a little bit and here's how I did mine. 


I clicked on the Trace button (you can also find this under Object button and scroll down to Trace). I then clicked the Select Trace Area. I outlined the area that you see below. Once this was done I hit the Trace button.


The boot outline will then change to a red color instead of yellow and you can take your cursor and separate the yellow boot from the red outline. This outline is what you will use to cut with the color of your choice.

I then proceeded to do this with all of the cuts. You will also need to remember to cut two boots for both sides. To save on paper waste, when cutting the black and pink, I moved the outlines closer together before cutting. 

I put silk flowers in mine, but if you add some support to the bottom of your box a small bud vase will fit very nicely instead. This would make a sweet gift for any occasion.

Recipe:
12 x 12 American Craft Papers
Wellie Box - Lettering Delights
Silk Flowers

Hope you enjoyed my project and thanks for stopping by!

Annette

Monday, March 10, 2014

Exploring Cricut Challenge - The Luck of the Irish

Good morning everyone! It's time for a challenge at the new Exploring Cricut and More. Create a card, layout or project to celebrate St. Patrick's Day. Your project must include a shamrock. Remember you can use any machine to create your project:)

I decided to create fun gift boxes for my kids to celebrate the holiday! 


The sentiment was made with the Silhouette Cameo. I chose black and sized to fit exactly in the scallop circle. 


Did you know they have teeny tiny Starbursts minis unwrapped. They are so cute and a bunch fit into my boxes!!


As you can see, the box is shaped like a triangle and the shamrocks are glued to the top and bottom of the box. There are 2 separate triangles that are glued to the top and bottom of the triangle sides for added support to the box. 

Recipe:
Silhouette Cameo
Clover Box - Silhouette Store
Scallop Circle - Silhouette Store
Sentiment - Skdigis
Scor Tape

Thank you for stopping by and hope to see some of your great projects too! Check out my DT sisters for even more inspiration for the upcoming holiday:)

Annette

Thursday, February 27, 2014

Exploring Cricut - Jar of Hearts

Good Morning! Hope your day is off to a great start. Today, I am sharing a project at Exploring Cricut.  I used quite a few cartridges to complete this card and, of course, my Gypsy.


Mason jars are so popular right  now and I was inspired by looking on Pinterest to create this one. I found the jar on the cartridge From My Kitchen and then welded the hearts to the jar. I used the x and y axis to make sure the hearts were even in their rows. The floral bg paper was also tweeked from Elegant Edges. I hid the heart that was in the bottom right corner to get the shape I wanted. 

Recipe:
A2 card base
Papers - My Mind's Eye
Jar - From My Kitchen 3.47"
Heart - George and Basic Shapes .37"
Bread Tag- Walk in My Garden 1.20"
Green Floral Mat - Elegant Edges
Sentiment - Hero Arts 
Yellow Stickles, Twine

Don't forget we still have a challenge you can enter. We would love to see your project. Thank you for stopping by!!

Annette


Monday, February 24, 2014

Exploring Cricut - Bag Box or Tag Challenge

Hello Monday! It's time for another fun challenge from Exploring Cricut. This week we are asked to create a bag, box or tag and include 1 ribbon in your project.

I created a box from Tags, Bags, Boxes and More and had warmer weather in mind when I chose this particular cut.  I used my Gypsy to size the box on a 12 x 12 mat. I also hid all the cut marks. It would be nice if the marks only scored the paper, however, it gives a cut that I don't like on the finished product. I used my Martha Stewart scorer to crease the areas that need to folded.


This is what it looks like after it is done on the Cricut. The flower pieces have a slit in each of them and the flower slides together. I placed the gold flower on top of that with a glue dot to give a little more dimension. The gold flower was created using the tag image on the same cartridge. 


Recipe: 

Box and Flower - Tags, Bags, Boxes and More 9.12", 265"
Button, Twine

Hope to see your great creations too:) Thanks for stopping by!

Annette


Sunday, February 16, 2014

Valentine Blog Hop Winner!

Hello to new and old friends! Thank you so much for hopping along with us. It's time to pick the winner for my blog candy! Random.org drew #3 - Stephanie who said: This is such a sweet card. Love that image. I'm a long time follower. stuff@gt.rr.com.  Congrats to you!!!

Stephanie please send me your mailing address so I can send you your goodies:)

Hope you all had a sweet Valentine's day!!

Annette

Thursday, February 13, 2014

Exploring Cricut - Love Bug

Hello, today is my turn to share a project at Exploring Cricut! Are you ready for Valentine's Day tomorrow?  Well, if not  there's still time:)I created this sweet love bug card to send to my oldest with some yummy treats. 


I really am enjoying using this paper stack from Doodlebug. I added Fruit Punch Stickles to the cheeks and Black Stickles to the mouth and eyes.

Recipe:
A2 cardbase
Doodlebug Papers
Love Bug - Simply Charmed
Sentiment - Hero Arts
Twine, Stickles

You have until Saturday to enter your Valentine project at Exploring Cricut. Remember, to check out the  hop  for a chance to win some blog candy!!

Thanks for stopping by!

Annette


Monday, February 10, 2014

Exploring Cricut - Valentine Blog Hop

Hello Monday and welcome to Exploring Cricut Valentine Blog Hop!! If you hopped from Emily then you are in the right spot. If not, hop back to Exploring Cricut so you don't miss a thing:) You can join in the fun by creating a card, layout or paper craft using 1 jewel celebrating Valentine's Day.  Our Design Team has some awesome projects for inspiration  You have until Saturday to enter our challenge:)

I created a card using the fun double sided papers from Doodlebug.

I created the shadow feature in white and popped the pink pattern paper up with pop dots. My jewel is tucked in between the heart that she is holding. 
Recipe:
A2 cardbase
Papers - Doodlebug
Girl Silhouette - A Child's Year
Jewel

There is blog candy to win too! To win: Let me know you are a follower and how to get a hold of you in the comments below. I will draw a winner Saturday. Good luck!!


Here's the schedule if you get lost along the way!


Now hop on over to Michelle for some more crafty goodness!!

Thanks for stopping by:)

Annette


Thursday, January 30, 2014

Exploring Cricut -

Good Morning! It's almost Friday and it is time once again to share with you at Exploring Cricut. My stash of thank you cards has definitely dwindled and I needed to make quite a few so I thought I would share a simple and quick one with you.


I popped the flower negative up with pop dots in the four corners and made it 1/4" smaller than the light purple paper. I chose to create a decorative pin by using a straight pin and a button. I attached them together using Glue Dots and then the ribbon on top. 

Recipe:
A2 card base
Stampin' Up Papers
Flower - Cindy Loo
Banner - Cindy Loo
"Thank You" Sentiment - Hero Arts
"So Much" - Tradefish Designs
Ribbon, Pin, Black Ink

Thank you for stopping by and remember you have until Saturday to enter our Cricut Choice challenge and take our survey! We hope you join in. Stay warm and toasty and if your somewhere sunny with a beach, I'm so jealous!!!:)

Annette


Monday, January 27, 2014

Exploring Cricut Challenge - Cricut Choice

Hello Friends! Time for another challenge at Exploring Cricut. This week it is "Cricut Choice". You are to create a card, layout or paper craft using any Cricut of your choice. It must include the color blue, 2 images and at least 1 pattern paper. Please head over to Exploring Cricut and take a quick survey for us. As you know, Cricut has come out with a new machine and we are wondering how you feel about it. With the Cricut changes comes new ways to craft and we would love to hear what your thoughts are. The survey will be up until Saturday. Thank you!!

I decided to create a card for the challenge using Doodlecharms. I have always liked the chunky images on this cartridge. They are so easy to work with. 


I attached vellum over my jar so that the stars would be more visible. There was not a separate jar lid for this particular image. However, not a problem. You can take the image and have the part you do not wish to cut hang off of the mat on the screen with either CCR or Gypsy. The lid was then edged in black ink. You can also cut the entire image out and then use only the portion you need for your project by cutting as needed. I also popped the sentiment up with pop dots.

Recipe:
A2 card base
Papers - Stash
Jar, Lid - Doodlecharms 2"
Stars - Doodlecharms 1.5"
Sentiment - Joy's Life Stamps
Blue and Gold Ribbon, pop dots, black ink

Thanks for stopping by! Hope to see your project this week and hear your thoughts on survey:)

Annette


Thursday, January 16, 2014

Exploring Cricut - Pink Birdie

Hello! How has your week been going? I think I am finally getting over this walking pneumonia. Geez, it lasts a long time. Hope you all are staying warm and healthy! I am sharing today at Exploring Cricut and I have a sweet thank you from a very cute pink birdie. 

Even though I use my Gypsy or CCR to create I still browse through my books I have stored alphabetically in photo boxes. It really helps when making sure you are getting all the layers needed or you would just like to see the images in multicolors. Books can also be stored on Ipads, Iphones, Nook etc. so they are really at your fingertips. At the cricut.com website there are digital pdf files of each book that can be downloaded to your devices.


So, I came across this sweet birdcage from Straight from the Nest but really wanted a stand too. 

Click to view full size image

I then went to my Gypsy search and typed in birdcage and came up with quite a few to choose from and decided on this one from 3 Birds on Parade.

Click to view full size image

Using my Gypsy, I flipped the Straight From the Nest bird to face the other direction and then cut the birdcage off of 3 Birds on Parade so that I could use the more decorative one. I joined the cage and stand together with a pink brad. 

Recipe:
A2 card base
Bird stand - 3 Birds on Parade 
Bird Cage and Bird - Straight from the Nest
Bird Cage - BoBunny Polka Dot Paper
Patterned Papers - My Mind's Eye
Ribbon, Diamond Stickles

Thanks for stopping by and don't forget to add your creation to our Winter Wonderland Challenge!

Annette

Monday, January 13, 2014

Exploring Cricut - Winter Wonderland Challenge

Good Morning! Are you up for an Exploring Cricut challenge? We have a great one for you and hope you join in the fun. Create a card, layout or paper craft celebrating winter or snow using any Cricut cartridge and colors. This challenge definitely fits into the weather we have been having in the Midwest.

I decided to create a 2 page layout for this challenge. using icy blues and grays. I am able to get 10 pictures on these pages. 


I popped up some of the snowflakes with pop dots.

Recipe:
Title - Gypsy Font 1.32"
Snowflakes - Joys of the Season 2.38", 1.62"
Swirls - Cindy Loo 2.36"
Ric Rac - Plantin SchoolBook 2.40"
Mats - Plantin SchoolBook 
Gems, pop dots

Thank you for stopping by!

Annette

Thursday, January 2, 2014

Exploring Cricut - Double Thank Yous

Happy New Year Everyone! Time to share at Exploring Cricut and I have a couple fun cards for you today. I created 2 cards with the same cut and what a time saver when sending all those holiday thank yous. 


I attached the tag to the paper and then adhered the clip with a glue dot on top of the tag. 


Be sure when using negatives you get all the extra pieces that aren't attached so you can glue them in as well. Luckily, for this word, I only needed the small triangle for the "a". The kraft hearts were stamped and then cut out free hand.

Recipe: 
A2 card base
Thanks - Cricut Craft Room .88"
Heart Stamp - 
Gems, confetti heart and sequins, twine, tag, clip

Thank you for stopping by!

Annette


Monday, December 30, 2013

Exploring Cricut - Happy New Year

 Time for another challenge at Exploring Cricut!! Diane has asked us to create a card, layout or project with a New Year theme. 

I created a card for the challenge and kept the background simple so the title would really pop. The numbers on the clock were created using the gel pens. I added silver Stickles at the base of the hands.


Recipe:
A2 card base
"Happy" - Straight From the Nest
Numbers - A Child's Year
Clock - Locker Talk
Gel pen, Silver Stickles

Thanks for stopping by and have a safe and Happy New Year!

Annette

Wednesday, December 18, 2013

Exploring Cricut - Christmas Tags

Good Morning! This week has flown by, but I'm sure it has a lot to do with all the activities for the last week of school before the holidays. It is my turn today to share a project with you at Exploring Cricut. 

While wrapping presents I realized that I had used all of the ready made tags and had none left. So, I decided to create some quick tags using my Cricut. I created them using my Gypsy to get them to line up properly. You can also do this in CCR.  I create 2 layers one with the tag and then a layer that has the images. This way when I take the pen out and put the blade back in my tag will be the only thing that will cut. The speed and pressure I used with the pen was 4 for each. 

The measurement of these tags allows you to get 12 tags in a 6 x 6 area on your mat. Using the Gypsy I can pause to change pen colors if need be. Make sure that when you are ready to cut you do not remove your mat from the Cricut. Your alignment will definitely be off when you go to cut your tags out if you do.


The red tag is definitely more subtle with the silver pen. I used a snow pen to make the stocking look fuzzy.


Different color Stickles were added to the tree for some character. I inked up the edges of the tags with the coordinating color of the pen.


Joys of the Season has tags with images all ready to go. I used a stamp for the "to" but you could certainly choose a font from the cartridges like I did above.

I still like making the elaborate tags with layers of paper for those special gifts, but these were really fast and got the job done:)

Recipe:
Tag - Plantin Schoolbook 1.12"
Tree - Winter Frolic 1"
Stocking - Doodlecharm 1"
Snowflake Tag - Joys of the Season 2.52"
To From - Lyrical Letters .29", Walk In My Garden .20"
Stickles, Cri-Kits Glitter Pens, Black ink, Snow pen

Thanks for stopping by!


Annette

Monday, December 16, 2013

Exploring Cricut - "It's Beginning To Look Like Christmas" Challenge


Hello and Happy Monday! It's time for another fun challenge at Exploring Cricut. DIane has asked us to create a card, layout or project with a Christmas theme. What a great way to get some things done before the holiday!

I decided to create a 2 page 12 x 12 layout for the Christmas season last year. I try to get as many pictures on my layouts as possible without looking crowded. By keeping my images to the sides I was able to accomplish that and keep the pictures the main focus.


The packages got some Stickles on there bows for more sparkle.


I inked Santa and the chimney with black ink and added Stickles to his rosy cheeks.

Recipe:
Papers = Bazzill, Scraps
Santa - 4.49"
Chimney - Simply Charmed 4.49"
Packages - 3.43"
Tag - Tags, Bags, Boxes and More 2.59"
Title - Wild Card 7.97", 1.30"
Ribbon, black ink, Stickles

Thanks for stopping by and go check out all the inspiration from my DT sisters. Hope you enter the challenge by Saturday:)

Annette

Thursday, December 5, 2013

Exploring Cricut - Thursday Project

Hello! Well, the week is almost over and it is my turn to share a project with you at Exploring Cricut. This is another CAS if you are looking for a fun gift for someone. Turtles are a favorite for the recipient of this gift, but the possibilities are endless.


I purchased the frame at Michael's with a coupon of course:) I used left over scraps, which is always a plus in my book. I chose to not add googly eyes to the turtle because the fit of the glass made it too tight.  Stickles looked to harsh for me. I might suggest if you decide to create this to leave the glass off if you really want something on the eye or get a frame that has more space between. 


I measured the inside of each frame and used my gypsy to create a rectangle of the same size. You can also do this in CCR. Remember to take your link off so that you can change height and width. I then was able to size my turtle exactly to fit inside of the frame.
I backed the turtles with white paper and think it really makes the colors pop. Sorry for the picture not being as bright. Cloudy weather here does not make for great pics.


Recipe:
Turtle - Walk In My Garden 
Papers - Scraps
Frame - Michael's

Thanks for stopping by and remember you still have time to create a Christmas card to enter our challenge!!

Annette


Monday, December 2, 2013

Exploring Cricut - Christmas Cards Challenge

Happy Monday Everyone! Today is another challenge at Exploring Cricut to get you all ready to start those Christmas cards. The challenge is to use any color with any Cricut cartridge and make a Christmas card.

When I have to mass produce cards I really like the CAS look. It seems that life has been super busy and this helps me get a project done and still share something from the heart that is handmade. This is also a great way to use up some of those scrap papers you have lying around:)


Recipe:

Ornament - Simply Charmed 3.71"
Papers - Scraps
Face - Peachy Keen Stamps
Sentiment - K.Andrews
Black ink, ribbon

For more inspiration, please check out the wonderful creations from my DT sisters!! Hope you decide to join in the fun!

Thanks for stopping by!!

Annette

Thursday, November 21, 2013

Exploring Cricut - Science Game

Hello! Today is my turn to share at Exploring Cricut and I have a fun school project you might enjoy. My youngest daughter asked to use the Cricut to create a board game for her science project.  This was a great project for the budget because we  had everything but extra dice, which we found at the $1 store. Gotta love that:)

My daughter chose to base her game loosely on the "Sorry" game. We started with a poster board and cut it down to a 20"x 20" square with the smaller squares measuring at 2 1/2". To make it more interesting, while learning, she added things like "draw again, lose a turn, etc.

One of the requirements for the project was to create 25 questions based on the subject matter, which was atoms and elements. She set to work choosing colors and shapes that would fit her theme. She used the gypsy to search for items. This can easily been done in CCR too. While I love my gypsy I do think searching for shapes is nice in CCR because it is a larger screen. You can hold the top button on the gypsy to enlarge the shape before selecting too.


The entire board was Mod Podged for a protectant. The "finish" piece was created by welding a circle and rectangle together in the Gypsy. 


The game pieces were created with a button as the base, a wooden ball and Stickles. The ball was attached to the button with E6000 glue.

Recipe:
Foam core board cut down to 20 x 20
Title - All Mixed Up 1.47"
Circle, Rectangle - George and Basic Shapes 3.47", 4.53"
"Start" and "Finish" - Plantin SchoolBook 1"
Beakers - LockerTalk 2.06"
Atom - Indie Art 2.06"
Radioactive - Indie Art 2.06"
Arrows - Gypsy Wanderings 1"
Dice - Indie Art 1"
Buttons, Wooden Balls, Stickles, Mod Podge, E6000 glue, dice

Thanks for stopping by and don't forget you have until Saturday, November 23rd to enter our challenge!

Annette